

Tickets
Tickets
Pelcro provides a built-in ticketing system that allows you to track, manage, and resolve customer support requests efficiently. Tickets can be created from the main Tickets page or directly from a specific customer profile.
Overview
The Tickets feature helps you:
- Create and manage support requests
- Assign tickets to collaborators (team members) or vendors
- Track ticket status (New, Active, Pending, Completed)
- View and manage tickets globally or per customer
You can access tickets from:
- The Tickets page (global view of all tickets)
- A Customer profile (tickets related to a specific customer)
How it works
-
Tickets are created to track customer issues or requests
-
Each ticket includes details such as:
- Subject
- Status
- Reason
- Assigned collaborator or vendor
- Description
-
Tickets can be:
- Assigned to collaborators or vendors
- Updated as they progress
- Marked as completed once resolved
-
Tickets created from a customer profile are automatically linked to that customer
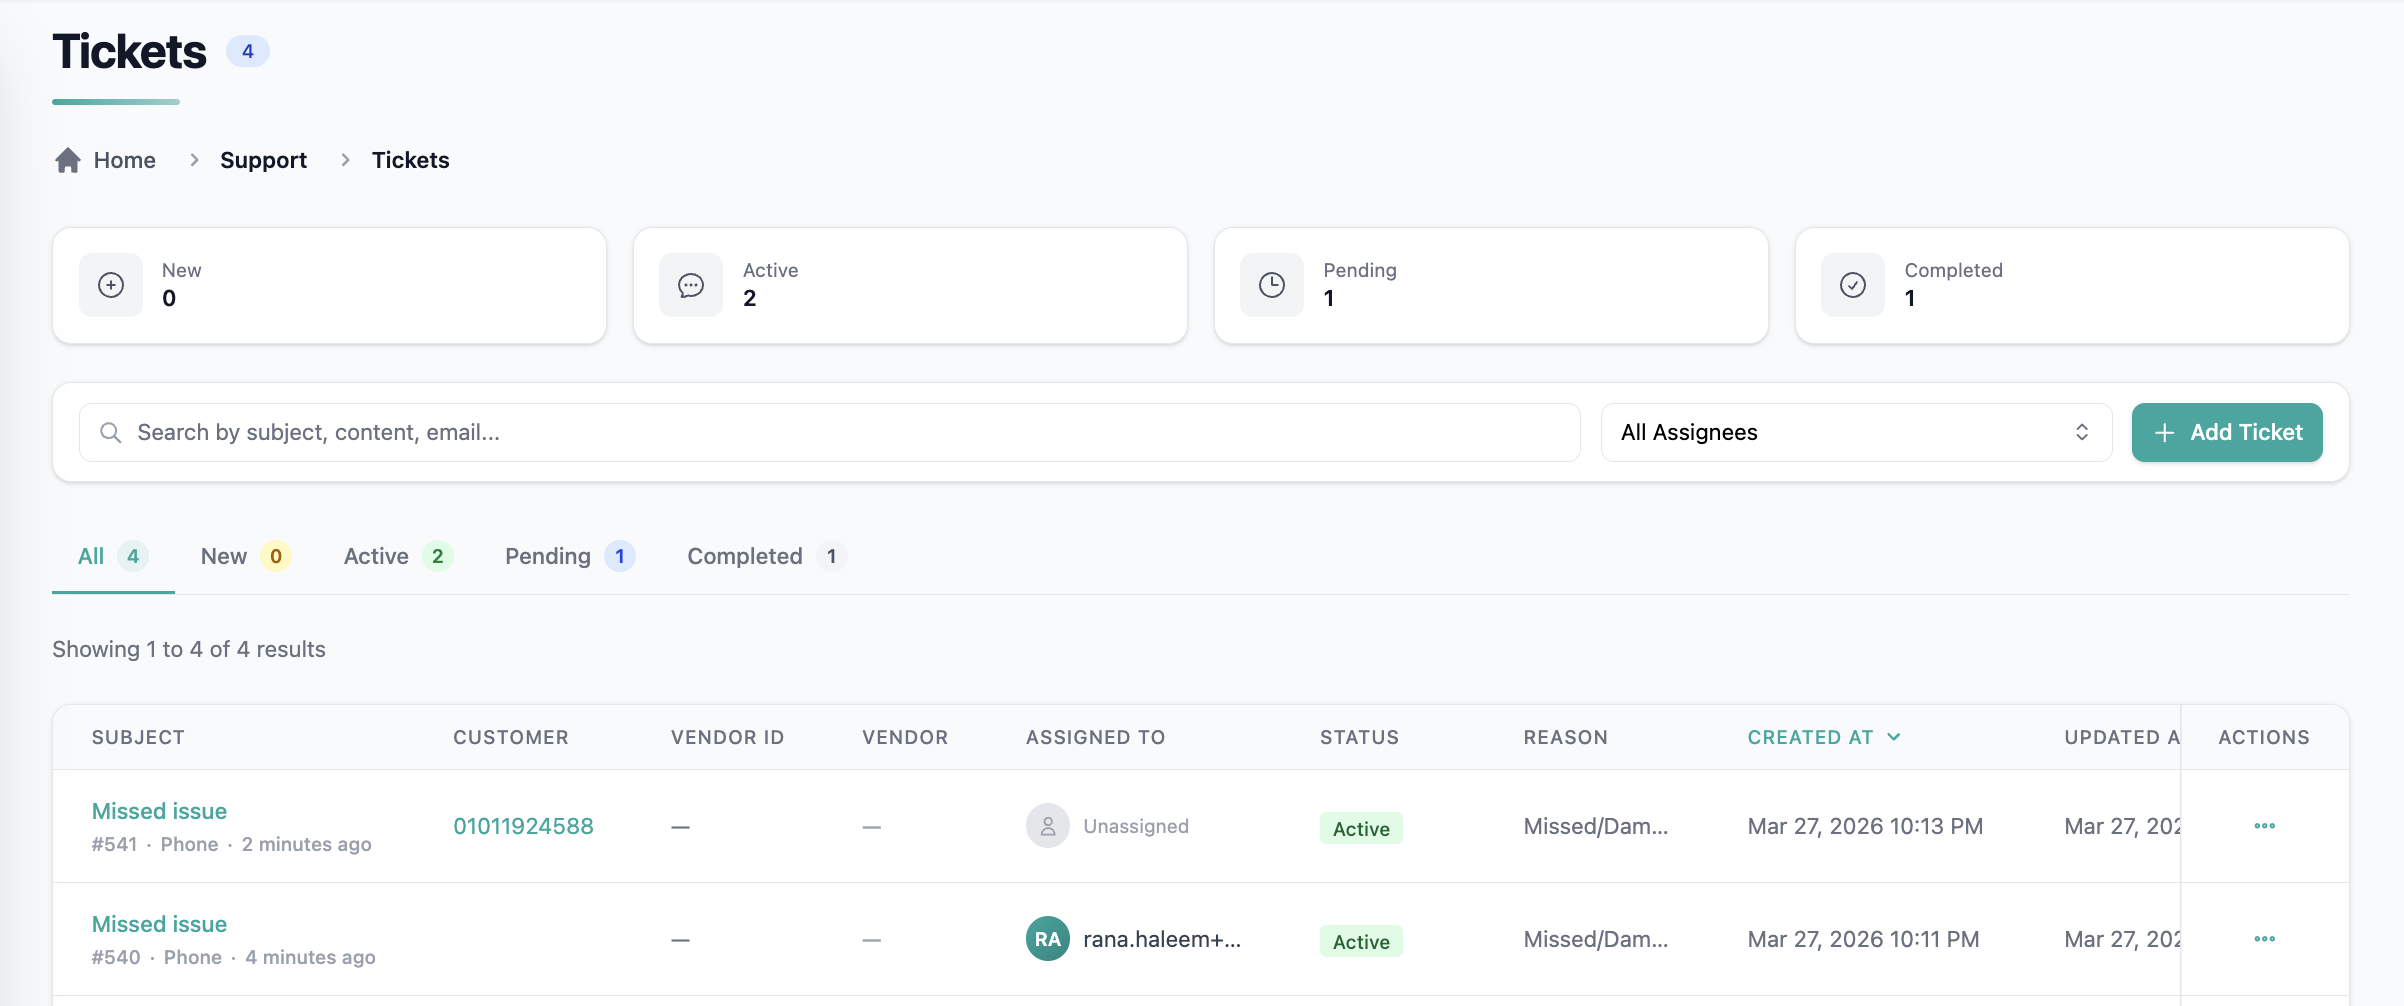
Creating a Ticket (from Tickets page)
- On the sidebar, go to Tickets
- Click + Add Ticket
- Fill in the ticket details (see fields below)
- Click Create Ticket
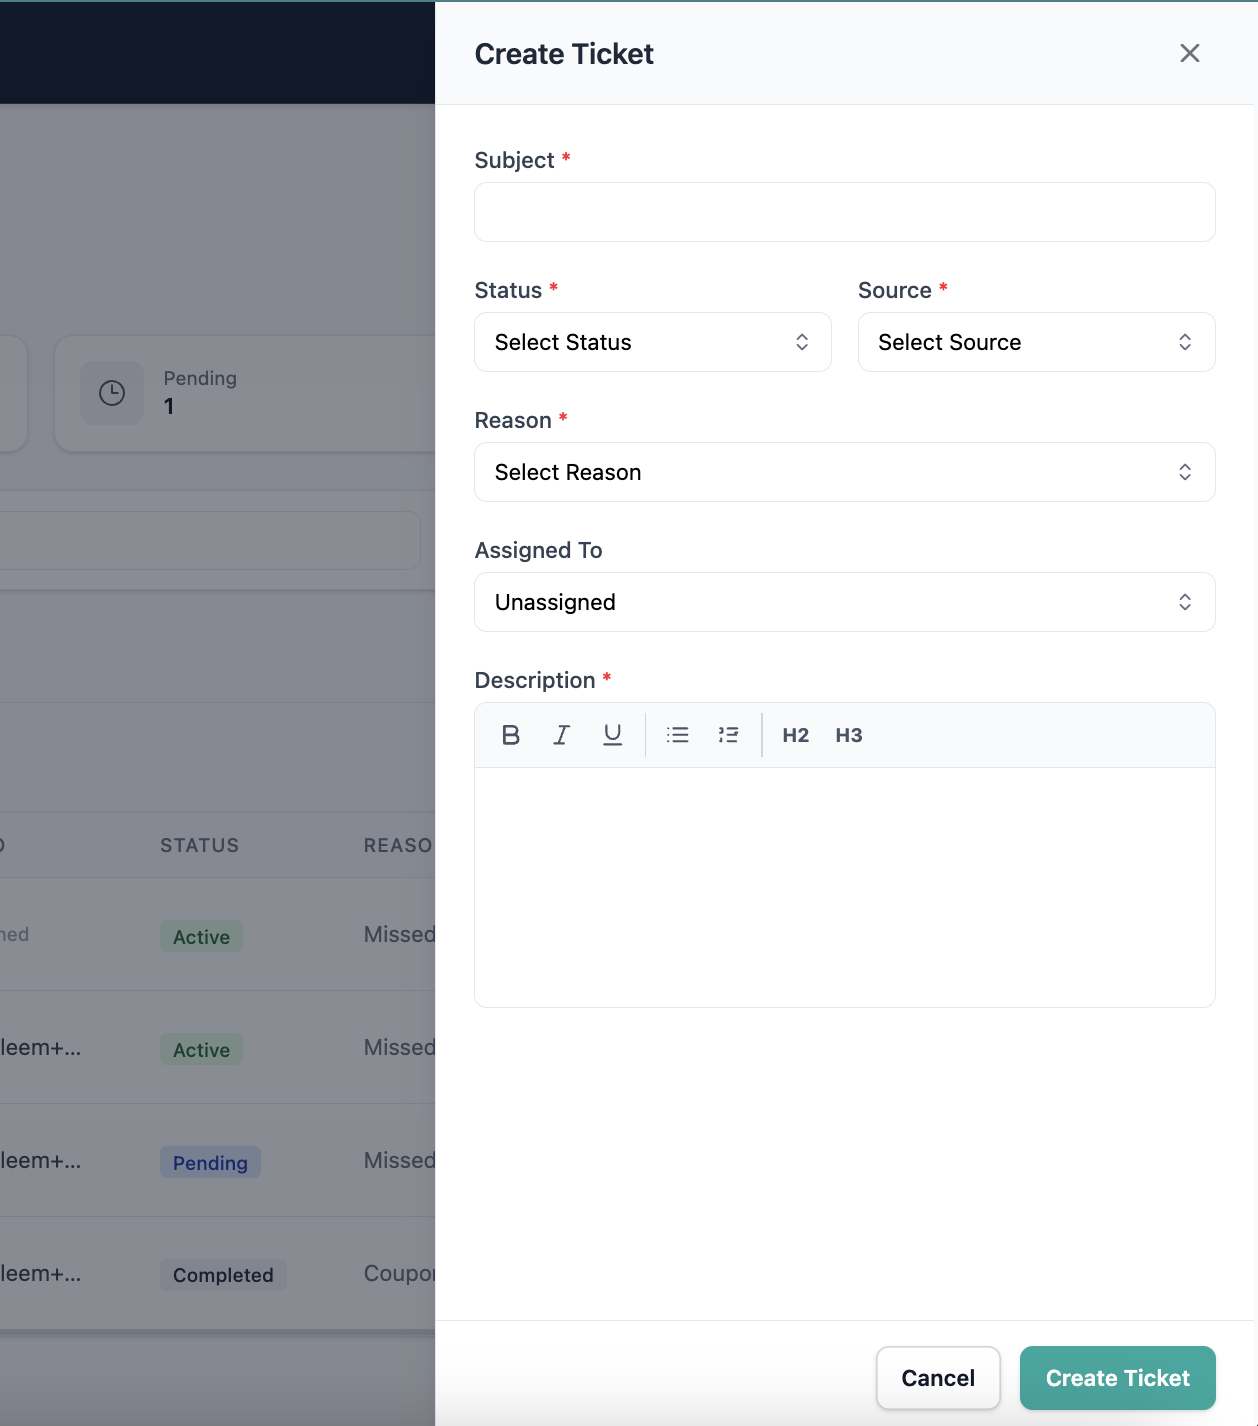
Creating a Ticket (from Customer profile)
- Open the Customer Profile
- Navigate to the Tickets tab
- Click + Add Ticket
- Fill in the ticket details
- Click Create Ticket
The ticket will automatically be linked to that customer and visible in both:
- The customer’s Tickets tab
- The global Tickets page
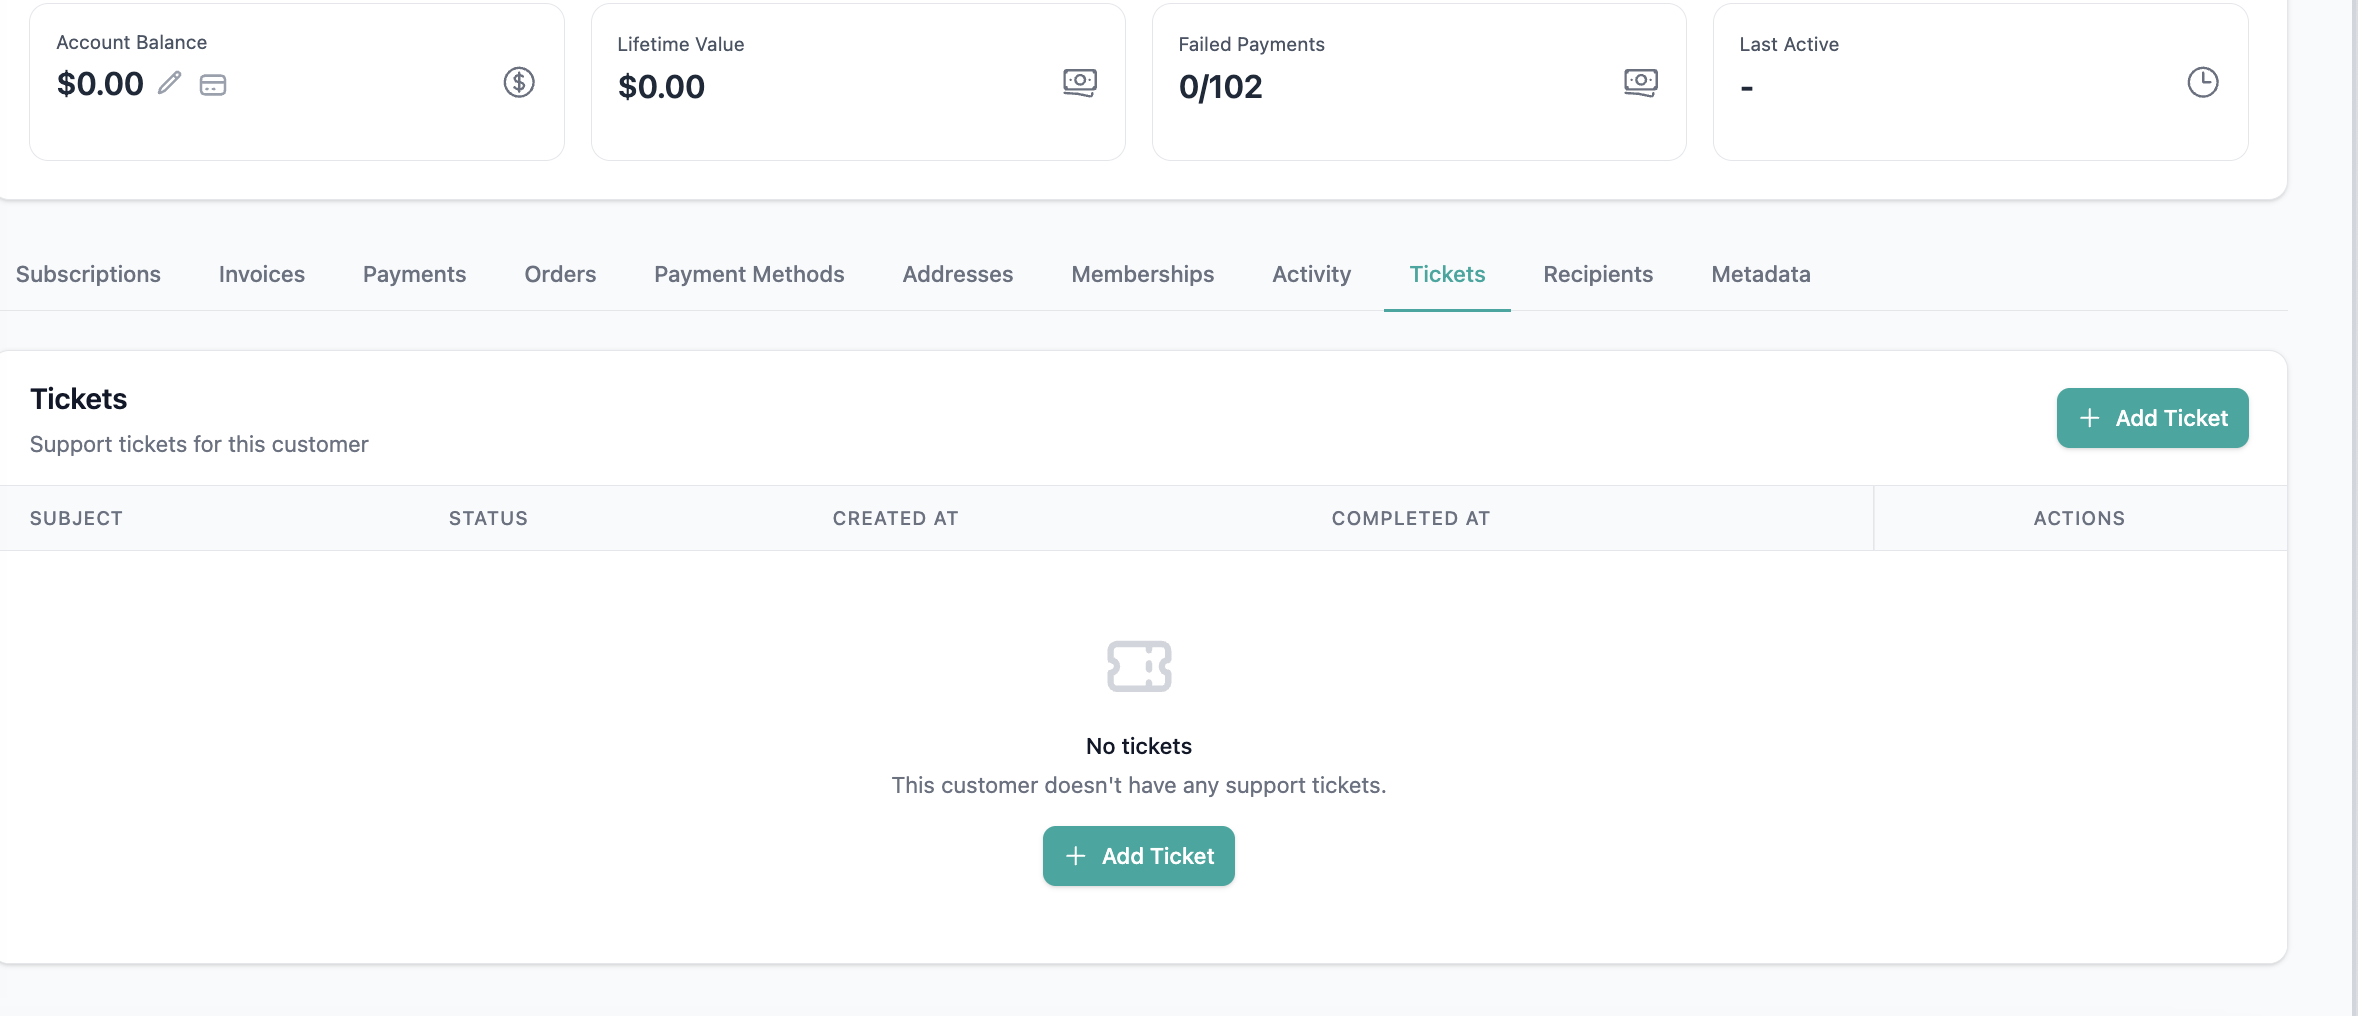
Ticket Fields
When creating a ticket, you will be asked to fill in the following fields:
-
Subject*
- A short title describing the issue
-
Status*
- Select the ticket status (e.g., New, Active, Pending, Completed)
-
Source*
- Indicates where the ticket originated (e.g., Web, Phone, Email)
-
Reason*
- Categorize the issue (e.g., Missed/Damaged issue, Billing, etc.)
-
Assigned To
- Assign the ticket to a collaborator (team member responsible for handling it)
-
Vendor
- Optionally assign the ticket to a vendor. The selected vendor's name and ID are saved and displayed on the ticket. Vendors can be updated or removed at any time.
-
Description*
- Provide detailed information about the issue
Managing Tickets
From the Tickets page, you can:
- View all tickets in a table format
- Filter by:
- Status (New, Active, Pending, Completed)
- Assignee
- Search tickets by subject, content, or email
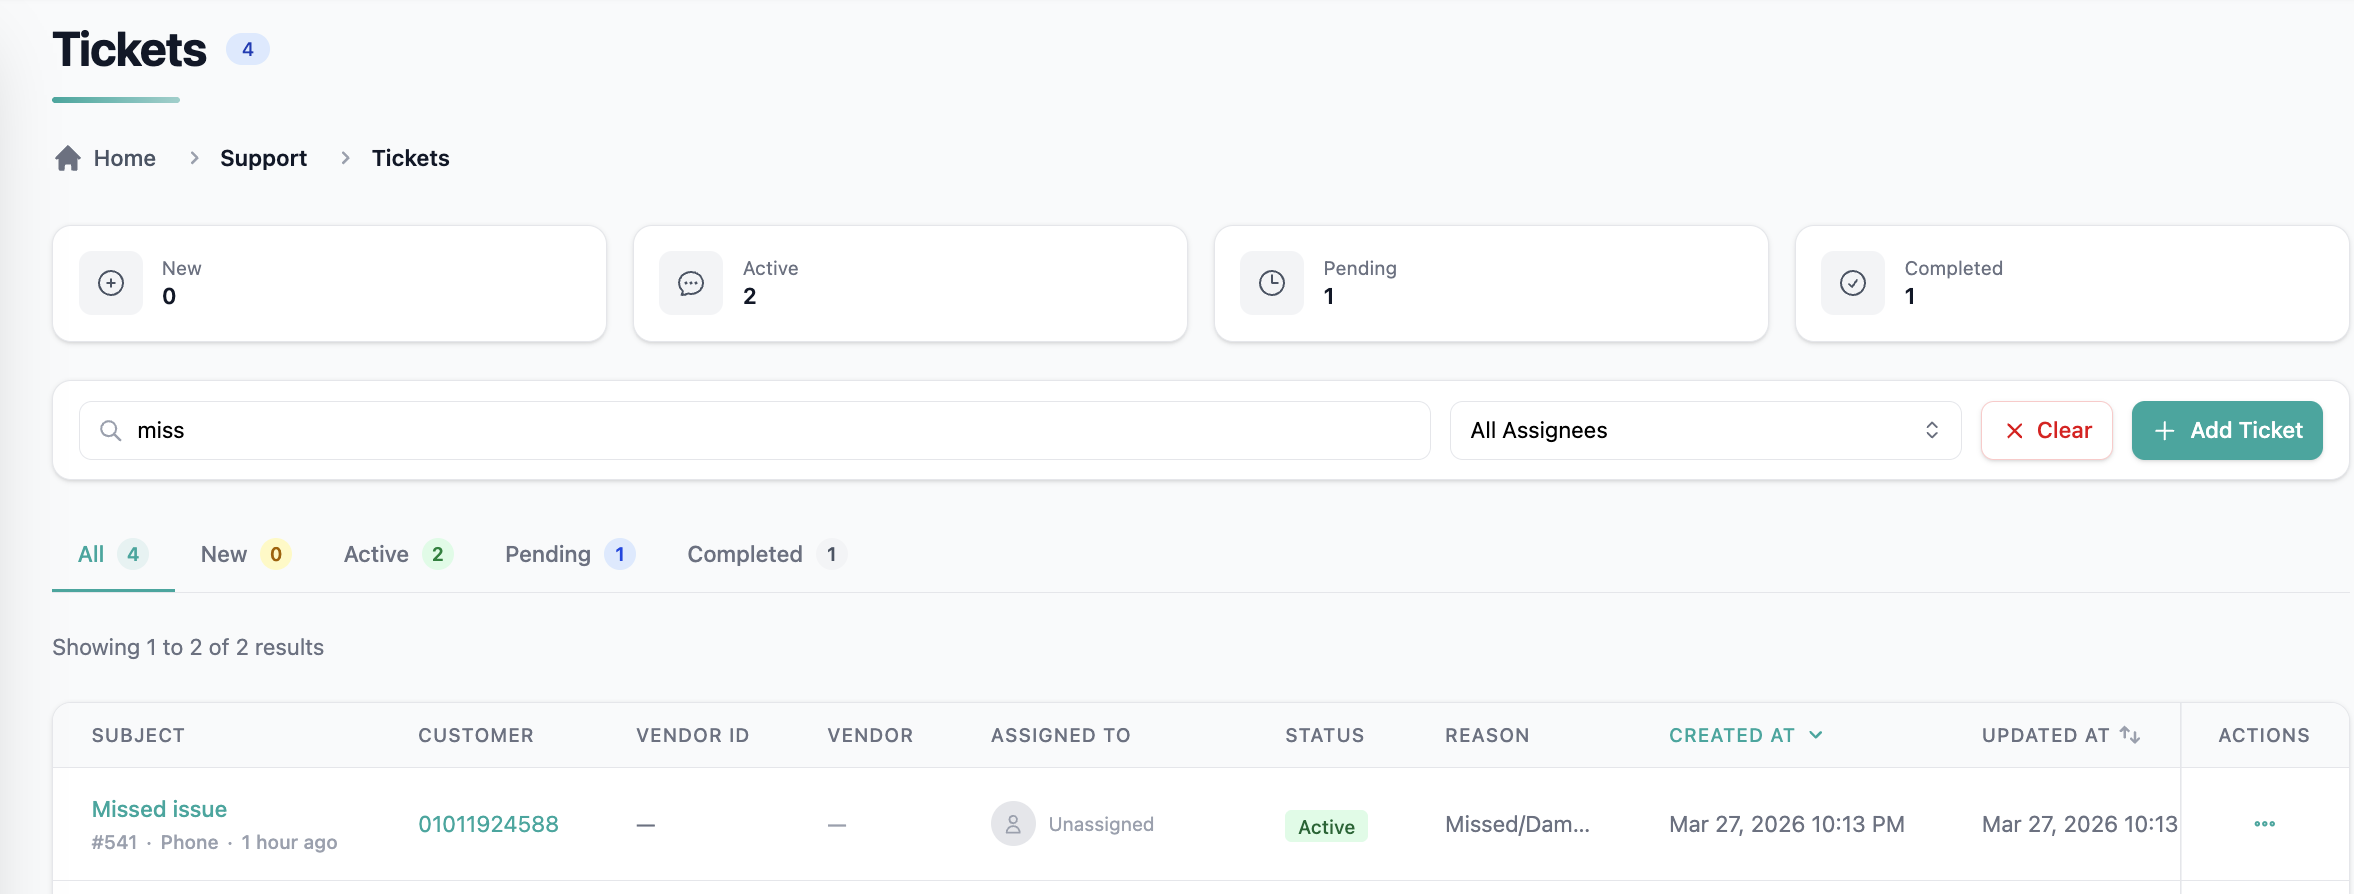
Actions
For each ticket, you can:
- Edit the ticket
- Mark it as Complete
- Delete the ticket
Email to Ticket
Ticket Center turns your support email into tickets automatically: customers write to the support address they already know, their messages open tickets in Pelcro, and agents reply from Pelcro under your own brand.
Setting it up has two halves — sending as you (so outbound ticket email comes from your domain) and receiving replies (so customer emails reach Pelcro). Both are configured under Settings → Ticket Center.
The sections below explain what each field on the Settings > Operations > Tickets Center page means.
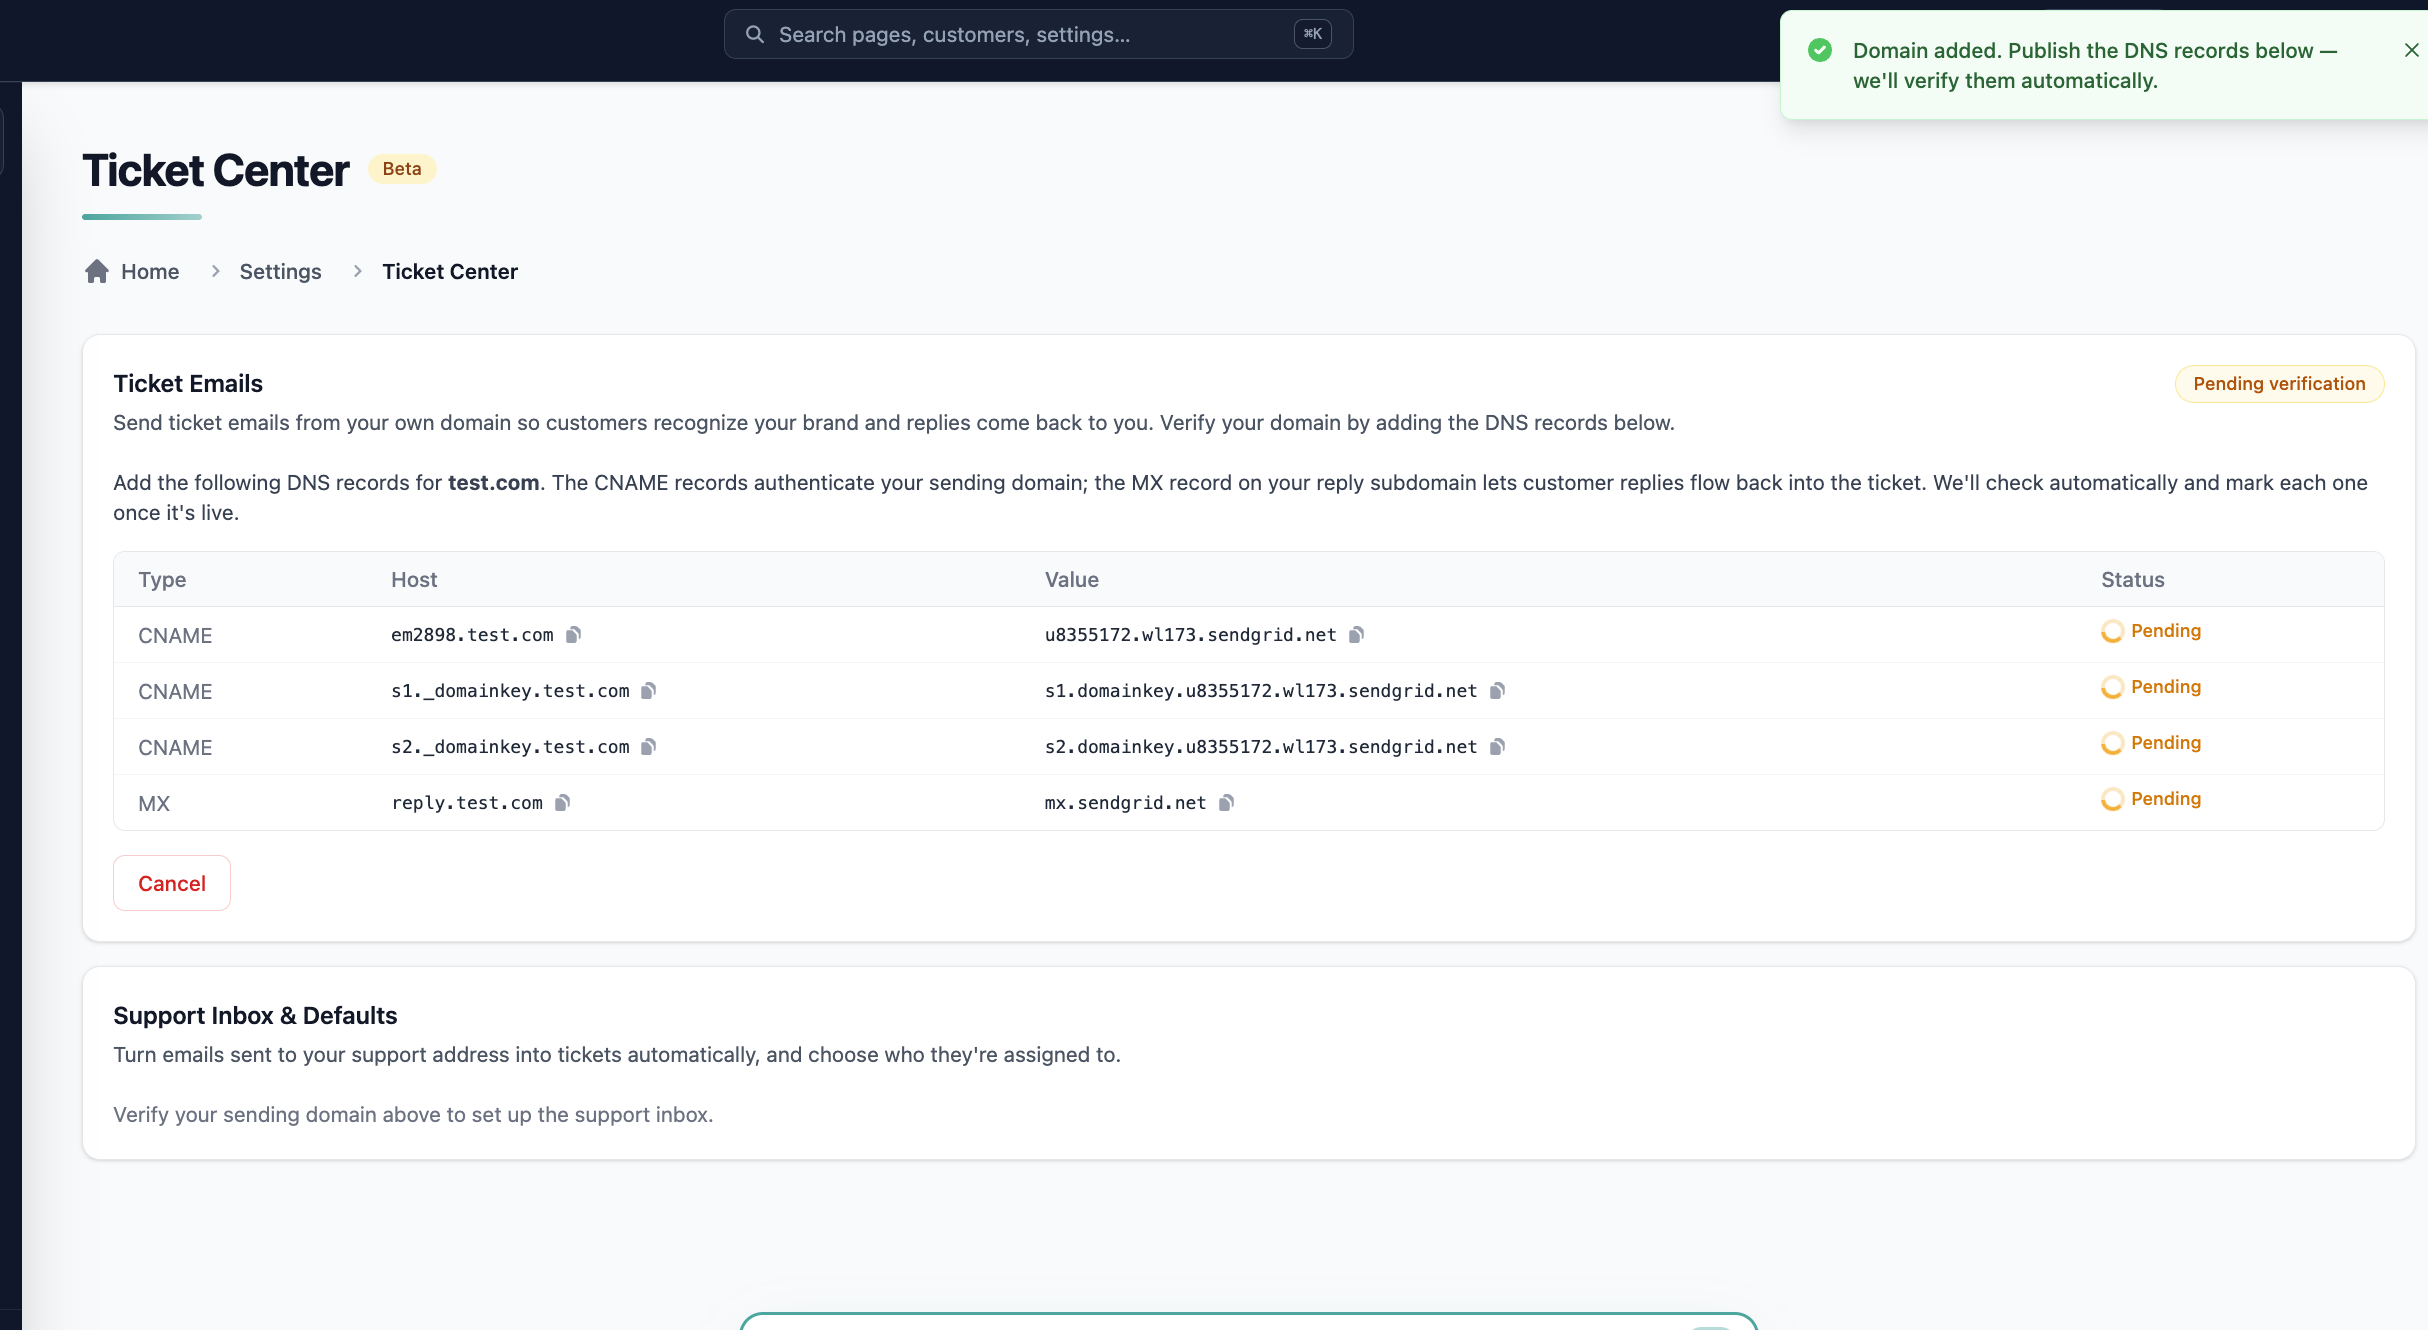
1. Sending domain
Your own domain, e.g. example.com. Everything else on the page is derived from it.
We register the domain with SendGrid so ticket emails go out as you rather than as Pelcro. This keeps your sender reputation — and any spam complaints — on your domain, not ours.
2. DNS records
After the domain is added, Ticket Center shows four records to publish in your DNS: three CNAMEs and one MX. They do two different jobs.
| Type | Host | Value |
|---|---|---|
| CNAME | em3846.example.com | u8355172.wl173.sendgrid.net |
| CNAME | s1._domainkey.example.com | s1.domainkey.u8355172.wl173.sendgrid.net |
| CNAME | s2._domainkey.example.com | s2.domainkey.u8355172.wl173.sendgrid.net |
| MX | reply.example.com | mx.sendgrid.net |
Pelcro checks these automatically and marks each one once it's live.
The 3 CNAMEs — these let us send as you
em####.example.com— the sending (link-branding) record.s1._domainkey.example.comands2._domainkey.example.com— DKIM. DKIM is the cryptographic signature that proves an email really came from your domain and wasn't forged. We use SendGrid's automatic security, so SendGrid holds the keys and you only ever publish CNAMEs — you never handle key material.
Note: Until all three CNAMEs are live, outbound ticket email is blocked. That is what the Verified badge on the domain card reflects.
The 1 MX — this lets us receive your replies
reply.example.com→mx.sendgrid.net
An MX record says "mail for this hostname goes here." The important part is that it sits on a subdomain (reply.), not your root domain.
MX records work per domain, not per mailbox — there is no way to route only [email protected] to us while leaving [email protected] with your normal provider. Pointing example.com itself at us would take over every employee's email. A dedicated subdomain means your existing email is completely untouched.
3. Support inbox and the forwarding address
Customers keep writing to the address they already know — [email protected]. That address stays with your own mail provider; we never take it over.
To get that mail into Pelcro, add one forwarding rule in your email provider:
[email protected] → [email protected]The second address is on the subdomain whose MX points at us, so anything forwarded there reaches Pelcro and opens a ticket. Ticket Center shows this address with a copy button plus step-by-step instructions for Google Workspace, Microsoft 365, and forwarding services.
Two things worth knowing:
- Gmail sends a confirmation email when you set up forwarding. That confirmation arrives in Pelcro as a ticket — open the ticket and click the link from there.
- It must be a forwarding rule, not a "send as" alias. We read the original sender off the forwarded message.
Why only the first email is forwarded
When an agent replies from Pelcro, the email goes out From [email protected] (so the customer sees your brand address) but with Reply-To set to a per-ticket address like [email protected]. That token identifies the exact ticket.
So the customer's reply comes straight back to us and lands on the same ticket — it doesn't take the forwarding hop. Only the very first message of a conversation is ever forwarded.
4. Forwarding verification (Send test email)
DNS records we can check ourselves. A forwarding rule lives inside your mail provider and is invisible to us — so without a check, a broken forward just looks like "no tickets are being created," with nothing pointing at the cause.
The Send test email button emails a one-time token to [email protected]. If the forward works, that email comes back to us through the reply subdomain and the badge flips to Forwarding verified. No ticket is created for it. A first real forwarded email verifies it too, so a client who is already receiving tickets never has to run the test.
The badge has three states:
- Not verified yet
- Waiting for test email
- Forwarding verified
5. Default assignee
The collaborator that auto-created tickets are assigned to. Only someone with access to that site can be selected. Without a default assignee, tickets from the support inbox arrive unassigned.
Notes
- Assigning tickets ensures clear ownership within your team
- Use statuses to track progress and resolution
- Creating tickets from the customer profile helps keep context tied to the customer
Updated 28 days ago