

Overview
We are taking security very seriously. It's our business to keep your business online, and security is a crucial part of this. Learn about security at Pelcro.
Secure connections
Pelcro forces HTTPS for all services using TLS (SSL), including but not limited to our public website, the platform, our APIs and CDN.
TLS 1.2+ offers a number of advantages including fast protocol streaming, secure primitives and enhanced speed and efficiency, which is enforced throughout our entire infrastructure, excluding our CDN.
For more technical information, see the best practices outlined in RFC-7525, which highlights the reasons why it is discouraged to use protocol TLS 1.0 and TLS 1.1, which are considered insecure.
Outgoing IP addresses
All traffic coming from Pelcro's infrastructure does so from fixed IP addresses. For added security, we suggest you protect your integration by whitelisting them. For instance, if your integration receives webhooks from us, make sure the events originate from either one of the IP address below:
18.223.179.234
18.118.178.213
Content security policy
If you have deployed or plan to deploy a CSP on your site, the directives will have to be modified so that your integration with Pelcro remains fully functional. We strongly encourage you to test your CSP against our staging environment before deploying it on your production website.
Below are the minimum required directives.
| Directive | Source(s) |
|---|---|
script-src | 'unsafe-inline' https://*.pelcro.com https://js.stripe.com |
style-src | 'unsafe-inline' |
connect-src | https://*.pelcro.com https://api.stripe.com |
frame-src | https://*.pelcro.com https://js.stripe.com https://hooks.stripe.com |
img-src | https://*.pelcro.com |
Additional directives are required depending on which features and integrations you enabled with us, such as Google Analytics, Google Tag Manager, PayPal, Google login/register, Facebook login/register or Risk Assessment.
Google Analytics
| Directive | Source(s) |
|---|---|
script-src | https://www.google-analytics.com |
connect-src | https://www.google-analytics.com |
img-src | https://www.google-analytics.com |
Google Tag Manager
| Directive | Source(s) |
|---|---|
script-src | https://www.googletagmanager.com |
img-src | www.googletagmanager.com |
PayPal
| Directive | Source(s) |
|---|---|
script-src | https://*.paypal.com https://*.braintreegateway.com |
connect-src | https://*.paypal.com https://*.braintreegateway.com https://*.braintree-api.com |
frame-src | https://*.paypal.com |
Vantiv
| Directive | Source(s) |
|---|---|
frame-src | https://request.eprotect.vantivprelive.com |
Google login/register
| Directive | Source(s) |
|---|---|
script-src | https://www.google.com https://www.gstatic.com https://apis.google.com |
frame-src | https://www.google.com https://accounts.google.com |
Facebook login/register
| Directive | Directive |
|---|---|
script-src | https://connect.facebook.net https://graph.facebook.com https://js.facebook.com |
frame-src | *.facebook.com connect.facebook.net |
img-src | *.facebook.com *.facebook.net *.fbcdn.net |
connect-src | *.facebook.com connect.facebook.net |
Auth0 login/register
| Directive | Directive |
|---|---|
script-src | https://cdn.auth0.com |
connect-src | https://*.auth0.com |
Risk Assessment
| Directive | Source(s) |
|---|---|
script-src | https://www.google.com https://www.gstatic.com |
frame-src | https://www.google.com |
img-src | https://www.gstatic.com https://www.google-analytics.com |
There is no policy that fits all website and implementing a good CSP is not trivial. To make your implementation easier, you can use anonline generator and we encourage you to validate your CSP header using a tool such as Google's CSP Evaluator . Do not hesitate to contact us if any part of the flow is not working as expected or if you have any questions.\
3DSecure payments
3D Secure 2 (3DS2) standard aims at increasing the security of online payments and is the main card authentication mechanism used to meet Strong Customer Authentication (SCA) requirements within Europe. For online card payments, the requirements defined by SCA apply only to transactions where both the business and the cardholder’s bank are located in the European Economic Area (EEA).
Pelcro currently supports 3DS2 on selected flows from the user interface, which are:
- Initial subscription creation from the user interface
- Invoice payment from the user interface
Authentication
Multi-factor authentication
For enhanced security, you can choose to enable Multi-factor authentication or MFA, a security mechanism that allows you to combine your username and password authentication, with, as a second factor, an additional authentication mechanism through a second device (typically your phone).
MFA works by requiring additional verification 6 digit code. With OTPs, a new code is generated each time an authentication request is submitted. Pelcro currently supports the following multi-factor authentication mechanisms:
- One-time passwords (OTPs) sent via SMS to your phone.
Enabling Multi-factor Authentication (MFA) for your site
First, you'll need to enable multi-factor authentication for your site and site collaborators. To do that, you'll need to have the Site Owner privilege. Learn more about collaborator permissions here.
- Navigate to your site settings by clicking your profile menu > Settings

- Under Security settings, click Multi-factor Authentication

-
You'll then arrive to the Multi-factor Authentication screen from which you can control whether to enable or disable MFA for your collaborators. When enabled, collaborators will need to setup their devices to login with multi-factor authentication.
-
Additionally, you must configure a "Grace Period" for your MFA to take effect. The value for this required field is the amount in days during which your collaborators (for which MFA was enabled) can still log in to your site, without being prompted for MFA. This give your collaborators a sufficient time before they are forced to setup their MFA according to your requirements.

- After you mark the checkbox and enter your desired grace period, click Submit for your changes to take effect.
- When MFA has been enabled, you should see a pop-up banner message indicating the date before which you (and your relevant collaborators) will need to setup MFA device.

Setting up Multi-factor Authentication (MFA) for your account
As a collaborator, you can set up your MFA as follows:
- Navigate to your password settings by clicking your profile menu > Password

- If MFA has been enabled for your account, you should see a section called "Multi-factor authentication". This section should show:
- The current status for your MFA authentication mechanism: Active or Inactive.
- Active: You have an active device which is currently setup to receive OTP codes.
- Inactive: You do not have an active device setup (or your device is no longer active, in case of the device being inaccessible or lost)
- The button to setup your MFA device
- The current status for your MFA authentication mechanism: Active or Inactive.

- Click Setup to be redirected to the MFA setup screen.
- Please note that when relying on SMS as the OTP authentication method, Pelcro will send you an SMS with a 6 digit authentication code when prompted. SMS cannot be delivered in all countries, so you'll need to check that your country is supported before proceeding further.


- If you do not have a phone number currently saved under your collaborator profile, you'll need to enter a phone number which you can receive SMS OTP on. The phone number needs to be in the E.164 international standard [country code][phone number]. Alternatively, this field will automatically be populated with the phone number which is currently saved under your profile information.

- Click "Send Authentication Code". At which point, you should receive a message on your phone with a 6-digit OTP. Enter your 6 digit OTP and click "Verify".
- The SMS will be received from "Pelcro" if your country supports Alphanumeric Sender IDs. The body of the SMS will reference the company name which is currently set under your account information. If there is no company name present, it will not be included in the SMS. We highly recommend populating the company name so that it can be reflected for collaborators for increased trust.


-
If you do not receive your OTP, you can click "Resend Code" for Pelcro to attempt sending you the OTP again. Please note that you're allowed a maximum of 3 retries, after which you'll need to wait for 15 minutes before trying to resend the code again.
-
Once you've entered the OTP authentication code successfully, you'll be redirected to your Dashboard. You'll notice that the notification banner is no longer there. This confirms you have successfully setup MFA for your account.
-
On your next login, after you enter your username and password, you'll be prompted to enter your 6 digit authentication code.

Enabling Multi-factor Authentication (MFA) for a collaborator
-
You can enable or disable MFA for your account, as well as other site collaborator accounts. To do that, you'll need to have site admin privileges. Learn more about collaborator permissions here.
- Navigate to your site settings by clicking your profile menu > Settings
- Under Account settings, click Collaborators

- You'll see the list of the collaborators for your site, along with a "MFA Status" column which will show you whether MFA is enabled or disabled for a given collaborator.
- Click on the ellipsis menu to the right-most column of the desired collaborator, followed by "Edit Collaborator".

- Click the "Enable MFA" checkbox as needed. Please make sure to enter a valid phone number for the collaborator.
- Click "Submit" to update the collaborator.

- When MFA has been enabled (and depending on the grace period setting), the collaborator should see the pop-up banner message indicating the date before which the collaborator will need to setup MFA device.
Lost access to MFA device
-
If the device that a collaborator is currently using for MFA (e.g. their phone) is lost, damaged, or not working, they can recover access to their account. Pelcro collaborators must contact another administrator (or the site owner) to disable MFA for them. Once they are able to regain access, they will have to setup a new MFA device before the grace period expires.
-
The collaborator can either contact an administrator directly, or alternatively, they can click the "Unable to access device" link on the MFA verification page, which will automatically send an email to notify the support email address listed under site settings for assistance.
-
If the device that a site owner is currently using for MFA (e.g. their phone) is lost, damaged, or not working, they can recover access to their account. Site owners must contact their Pelcro account manager directly (or Pelcro support) to disable MFA for them. Once they are able to regain access, they will have to setup a new MFA device before the grace period expires.
Strong Password Enforcement
Tip: Ensure this setting is enabled for better customer account security
When this setting is enabled, customer passwords will be required to include a combination of uppercase and lowercase letters, numbers, and symbols to ensure security.
Strong Password Enforcement
Tip: Ensure this setting is enabled for better customer account security
When Strong Password Enforcement is enabled, customer passwords must meet enhanced security requirements to align with modern authentication standards.
Password requirements include:
- Minimum 15 characters
- Maximum 64 characters (supports passphrases)
- Must include a combination of:
- Uppercase letters
- Lowercase letters
- Numbers
- Symbols
These rules apply to:
- Customer sign-up
- Password reset
- Password change
Note: These requirements apply only to newly created or updated passwords. Existing passwords will remain valid and will not be automatically reset.
How to Enable
To enable Strong Password Enforcement:
- Navigate to Settings
- Go to Authentication
- Enable Strong Password Enforcement
Once enabled, all newly created or updated passwords will be validated against the requirements above.

Failed Login Attempts Lockout
Tip: This setting is enabled by default to protect customers against unauthorized access.
This setting is enabled by default and locks out accounts after a certain number of unsuccessful login attempts for enhanced security. The default values are 10 for the maximum number of failed attempts and 5 minutes for the lockout period.

Fraud Prevention
Fraud prevention is crucial to maintaining the security of your online business. Pelcro takes a variety of different precautionary methods to ensure that your data and online operating experience are safe and secure when using the platform. We have four main fraud prevention options:
- Risk Assessment Feature
- Customer Email Verification
- CVC Credit Card Check
- Activity Monitoring
Risk Assessment
Protecting your site from Fraud can be essential to your business. Malicious software and abusive activities are very common on the internet, and protecting your site from fraud will provide you with a more seamless experience with Pelcro. Some examples of fraudulent activity:
- Card Testing Attack: Card testing is a type of fraudulent activity where someone tries to determine if stolen card information can be used to make purchases.
- Account Creation Fraud: This relates to any customer account created using fraudulent information.
Those fraudulent activities can be monitored by Pelcro while leveraging reCAPTCHA which is a system that enables web hosts to distinguish between human and automated access to websites.
In order to activate this feature, please follow the instructions below:
1. IMPORTANT: This feature is only supported with our default UI and version 2.6.0+ of our react elements. If you have your own implementation or if you're unsure, please contact [email protected] or your Account Manager before enabling.
2. Log in to Pelcro and go to your settings.
3. Click on Fraud Prevention as shown in the image below.

Fraud Prevention Setting
4. Next, click on the "Click to enable risk assessment" button to configure the following:
- A configurable slider : It allows you to control blocking sensitivity based on risk scores. Moving the slider to higher values (toward 0.9) increases the strictness of the filter, meaning more legitimate traffic may be blocked, while setting it lower (toward 0.0) will focus on blocking only very high-risk traffic. Here’s a breakdown of each setting:
- 0.0 (Very High Risk Only): Blocks only requests with an extremely high-risk score, focusing exclusively on traffic identified as very high-risk.
- 0.1 (Very High Risk): Blocks all requests with a high-risk score of 0.1 or lower, slightly expanding the range of blocked traffic but focusing on highest-risk requests.
- 0.2 (High Risk): Blocks all requests with a high-risk score of 0.2 or lower.
- 0.3 (Medium Risk): Blocks all requests with a medium risk score of 0.3 or lower, filtering some medium-risk traffic while still permitting most legitimate users.
- 0.4 (Medium Risk): Blocks all requests with a medium risk score of 0.4 or lower, slightly increasing strictness.
- 0.5 (Medium Risk): Blocks all requests with a medium risk score of 0.5 or lower, balancing security with access for more legitimate traffic.
- 0.6 (Low Risk): Blocks all requests with a low risk score of 0.6 or lower, adding more moderate filtering to capture low-risk threats.
- 0.7 (Low Risk): Blocks all requests with a low risk score of 0.7 or lower, which may start to impact some legitimate traffic.
- 0.8 (Low Risk): Blocks all requests with a low risk score of 0.8 or lower, filtering most low and medium-risk requests and potentially some legitimate ones.
- 0.9 (Very Low Risk): Blocks nearly all requests with risk scores below 0.9, allowing only the traffic identified as lowest risk. This setting will block the largest amount of traffic, including many legitimate requests.\
- Analyze Only without Blocking: Allows the Risk Assessment feature to analyze all incoming requests without blocking, providing insights into traffic without impacting user access.
- Block All Requests: Blocks all incoming traffic—a useful option in situations of an active, ongoing attack.
Moreover, you can also protect all domains associated with your website against bots and fraudulent activity by adding your subdomains in the allowed domains section as shown in the screenshot below.

Risk Assessment
5. After configuring your settings risk assessment will be activated on your site. Please make sure that you have followed the steps carefully.
Customer Email Verification
The Customer Email Verification feature on Pelcro, if enabled, will require your customers to verify their email. Pelcro will send out an email with a verification link to your customers. If they do not verify their email, they will have limited access to the Pelcro features such as subscriptions and e-commerce purchases.
This can greatly support you in Fraud Prevention as the customers will have limited functionality until they verify that they are using a real email.
If you would like to activate this feature, please make sure you have the updated version (3.0.0) of React Pelcro JS. If you're not sure, please contact your account manager.
To activate this feature, go to your settings page on Pelcro, click on 'Settings', and then scroll down to 'Customer email verification' and enable the feature.
CVC Credit Card Check
When the option for "Decline credit cards when CVC check is set to unavailable" is enabled, only credit cards used for payment that has passed CVC checks would be allowed to complete a transaction.
Activity Monitoring
In this section, you have the control to actively monitor for any unusual activities. You can choose the specific event, set the timeframe, and decide on the corresponding actions for overall security.
In order to activate this feature, please follow the instructions below:
1. Log in to Pelcro and go to your settings.
2. Click on Fraud Prevention as shown in the image below.
Fraud Prevention Setting
3. In the Activity Monitoring section, click on 'Create Your First Rule.'
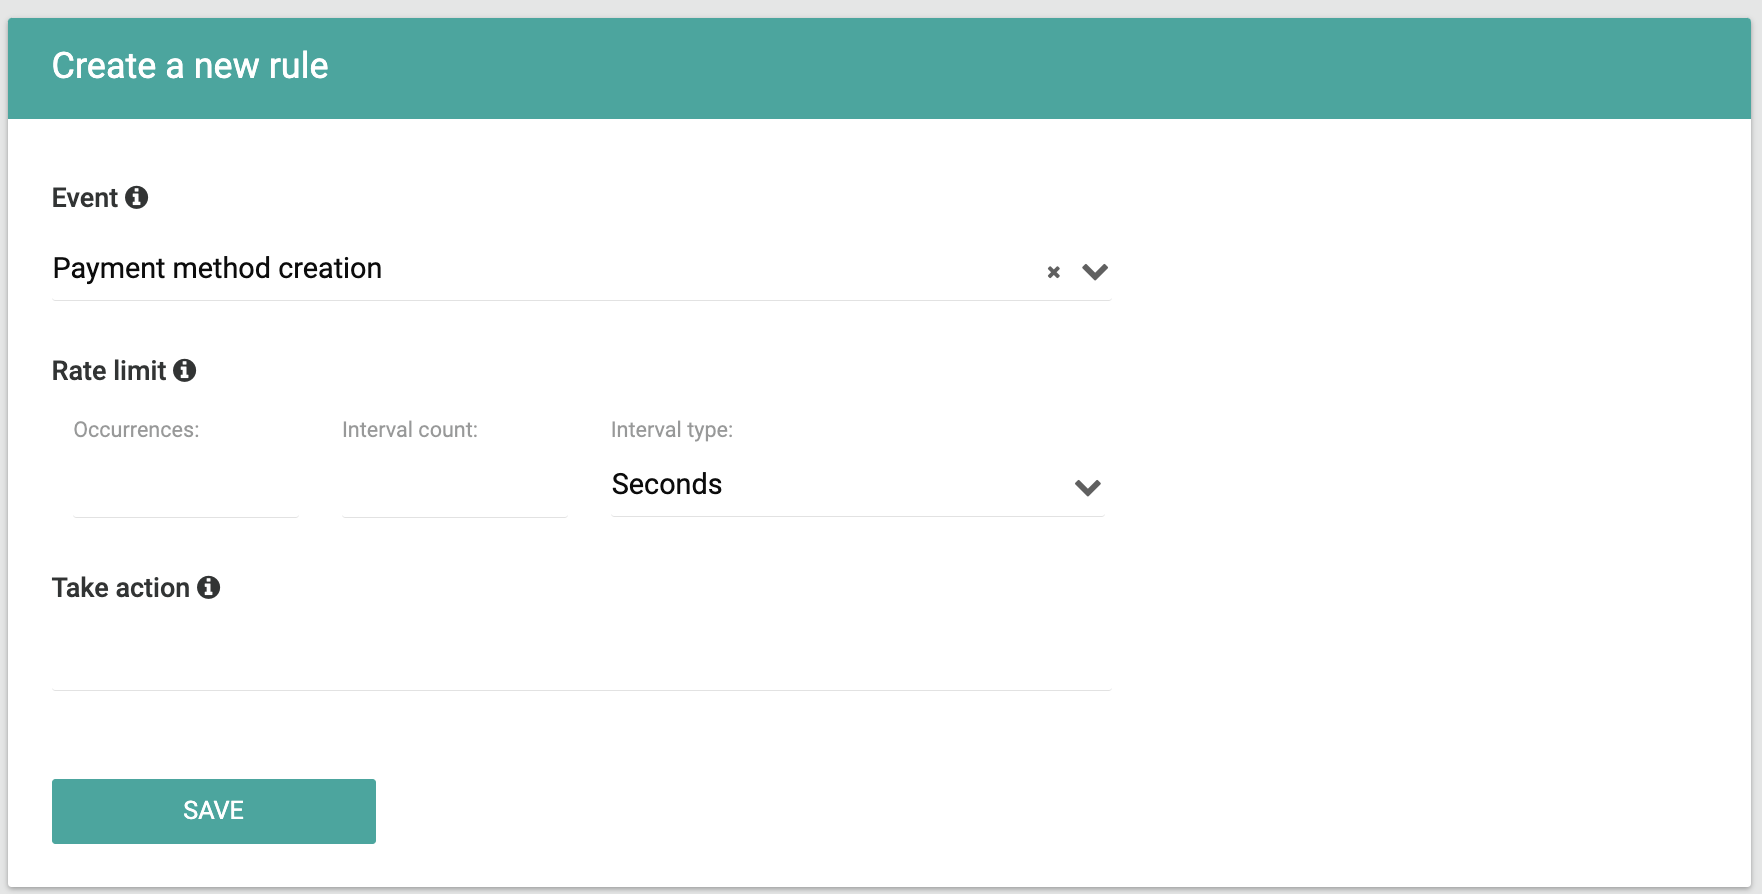
4. To create your first rule, you will have to fill the following fields as shown in the screen:
- Event: The event that will be monitored.
- Rate Limit: The maximum occurrences of the chosen event within the specified time window.
- Take Action: The actions that will take place upon reaching the event occurrences within the defined time window, for example, 'Block customer,' 'Notify with a webhook named
fraud_prevention.triggered' and 'Flag the customer'.
Please note that blocking the customer will result in preventing them from performing any further operations through the open APIs.
Flagging Customers
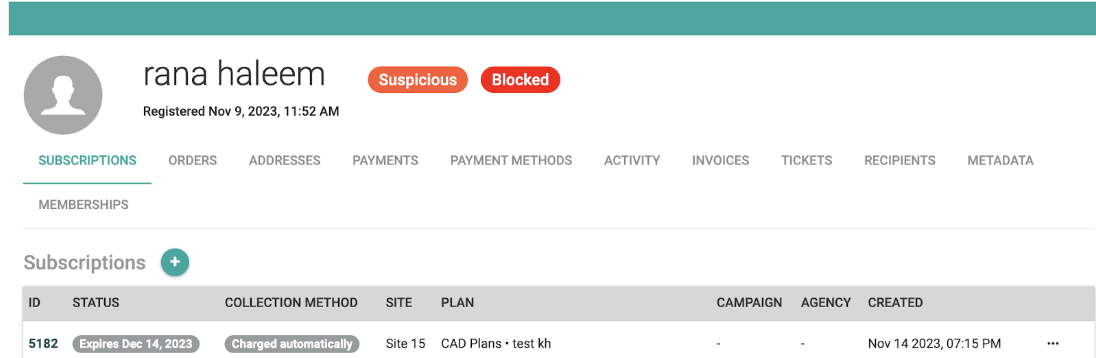
If a customer violates any configured activity monitoring rules, they will be automatically flagged with the tag 'Suspicious' under the 'Customer Details' view, as illustrated below. Additionally, the 'Fraud Status' column in the 'Customers' table view will reflect this 'Suspicious' tag. Moreover, if the customer was blocked, the 'Blocked' tag will be added as well.
Managing Flagged Customers
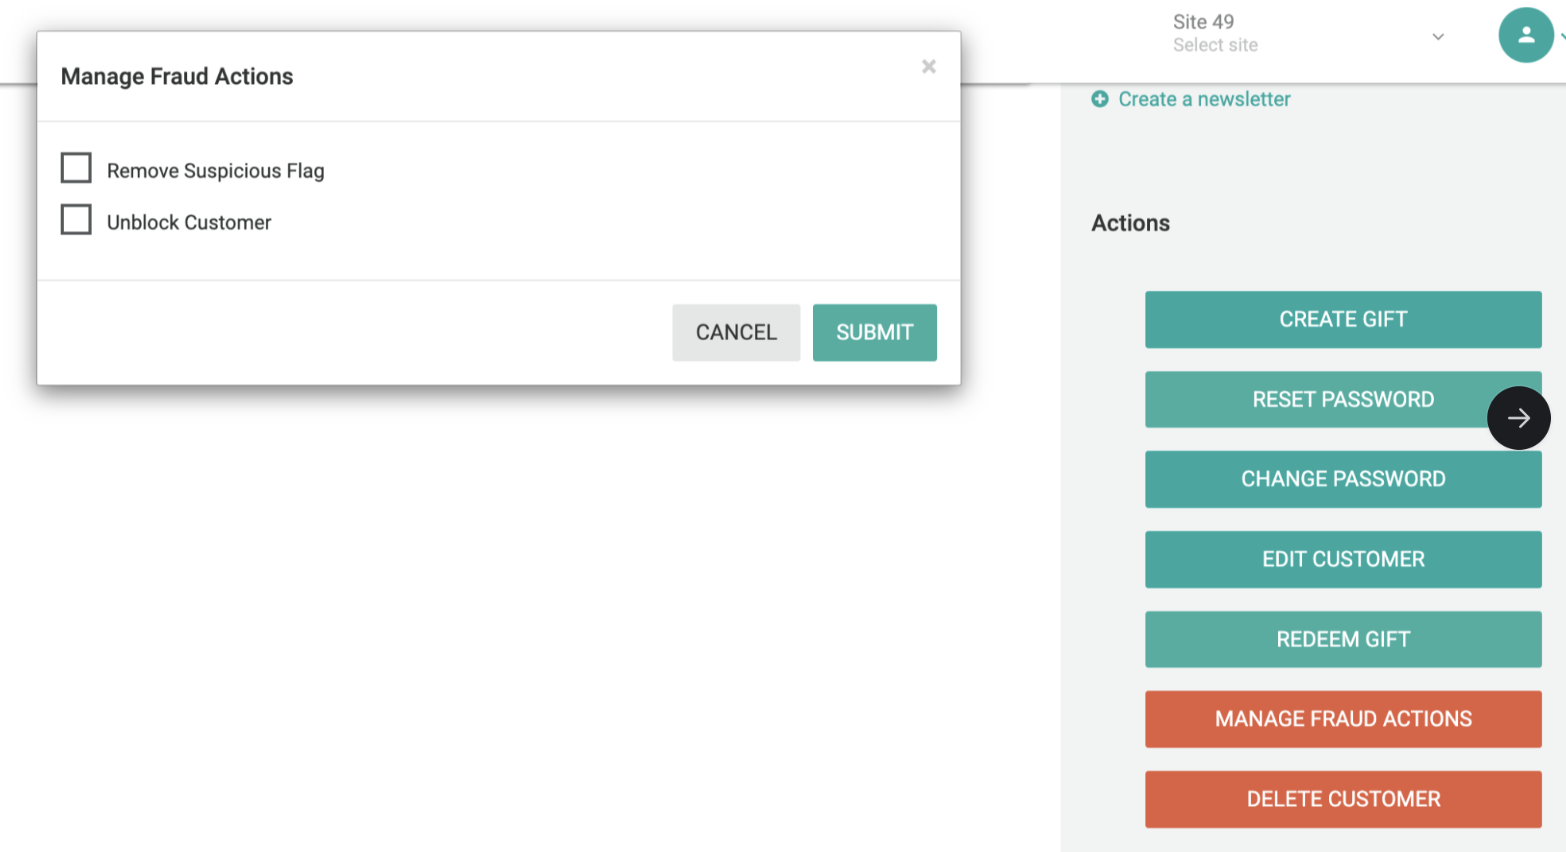
You can still give your suspicious customers a second chance by navigating to the customers page and choose 'Manage Fraud Actions' button.
Upon clicking, a popup will display with options based on previous fraud settings:
- Remove Suspicious Flag: This option appears if the admin had flagged the customer. Use it to remove the "Suspicious" tag.
- Unblock Customer: Appears if the admin had blocked the customer. Use it to unblock the customer.
Updated 4 months ago