

Memberships
Introduction to Membership Management
Membership is a feature you can leverage when you're looking to start offering enterprise, corporate or group subscriptions for schools, organizations or the such.
The feature allows you to create a subscription that operates on a more personalized basis, where you can limit the number of available seats and grant special access to your members. This access is set, based on a specific team or group of customers that will become an active part of your group or organization. On Pelcro, it’s a form of identity management and access control enabled via the platform.
The feature is made to help you manage your memberships in a seamless and effective way. If you're familiar with Pelcro's group-owner/group-user feature, what you need to know is that we're moving the group owner/user relationship one level up, from the subscription level to the plan level. Some other must-knows before getting started are:
- A membership owner gets billed instead of all the individual membership members
- The membership owner has full control of the account
- Each member under a membership plan gets access to the same entitlements and features as the membership owner.
- The membership owner also has the ability to add and remove members based on domain or IP address via the CRM.
Think of it like a family, where the membership owner is the matriarch/ patriarch, and ideally, they are in control of the household, and then all the members, are the people who live there and have access to the same water, food, amenities, etc.
Key Terms
Membership Owner: The primary point of contact responsible for managing the membership, and its members. The invoice will be tied to the membership owner.
Members: These are the members that belong to the membership plan. They are not involved in the billing process for the membership plan. They are added only by the membership owner via email address and domain or IP address. However, they do receive all the same entitlements as the membership owner.
Once the membership plan is cancelled or expires, the membership owner loses all access to the membership plan, as do the members.
To set up the membership management feature, you follow the below tutorial, which gives a step-by-step run-through:
Membership actions & steps
.jpg")
A) Listing Memberships
To view your memberships follow the below steps:
1. On your Dashboard, hover over your left navigation menu > choose Billing > Memberships

2. In the search panel, use the search drop-down list to either search all of the parameters simultaneously by setting the search dropdown to "All" or refine your search further by choosing specific search filters

3. In the search panel, you can also use the search filter button to filter on any of the below-clarified search filters then click on Apply filters button to display search results.
| Filter name | Filter description |
|---|---|
| Membership status |
|
| Membership Plan | Filter on the plan tied to the membership plan |
| Membership creation date and expiry dates | Filter on the from and/or to dates |
| Seat Capacity | Filter memberships based on seat usage and capacity (e.g., memberships with available seats or fully utilized memberships). |

Notes:
a) Your filtered criteria will be visible under the search bar. You'll be able to remove any of the selected filters by either clicking on the 'x' button next to the filter or you can clear all filters altogether by clicking on the clear all filters button.
b) You can export your memberships list, along with all the listed details into CSV format. The export will take all of your specified filters into account for the exported data.
B) Creating a Membership Plan
A step-by-step process of creating the membership plan, it’s very similar to a subscription pricing plan with a few adjustments on the way, specifically with the plan type and capacity.
1. In the Pelcro platform click on Products from the left navigation menu

2. Click on the product/s you wish to add the membership to

3. Click on Add pricing plan to create a membership plan

4. Fill in the required details clarified in below table then click on Optional to fill in the Optional fields
6. When done Click on create plan
| Field name | Field description |
|---|---|
| Nickname | Type in the membership plan name |
| Product Type | Select the product type from the drop-down menu |
| Currency | Select currency from the drop-down menu |
| Unit price | Type in the unit price |
| Revenue recognition type | Select revenue recognition from the drop-down menu |
| Billing interval | Select Billing interval from the drop-down menu |
| Interval count | Type in the interval count |
| Plan availability | Select availability from the drop-down list |
| Refund policy | Select from the dropdown list if refundable or non-refundable |
| Plan type | Make sure to select Membership from the drop-down list. This enables the feature and allows you to create a membership pricing plan instead of just a regular pricing plan. |
| Member seat capacity | Specify the maximum number of members to be added to the membership |

.gif")
C) Creating The Membership owner
There are two ways you can create the membership owner for a membership plan; one way is by creating a new customer from scratch.
Alternatively, you can turn existing customers into membership owners by linking them to the membership plan. similar to adding a customer to a subscription.
1. From the left panel click on Customers

2. Click on customer or from the ellipses > view

3. Click on Add a new subscription

4. Click on add a product and select the product with a membership plan.
You can search your specific product and plan with the plan ID, name of the product, or name of the plan.

5. Add the IP address or domain under the corresponding field, depending on which option you select.
Currently, we offer two options for how this can be done. Either with an IP Address which would require the membership owner to type out the IP addresses of the devices that would be allowed in this membership, or by email address domain.
You can add an IP address range as shown below.

6. Type the domain name if you’re doing it by the domain name

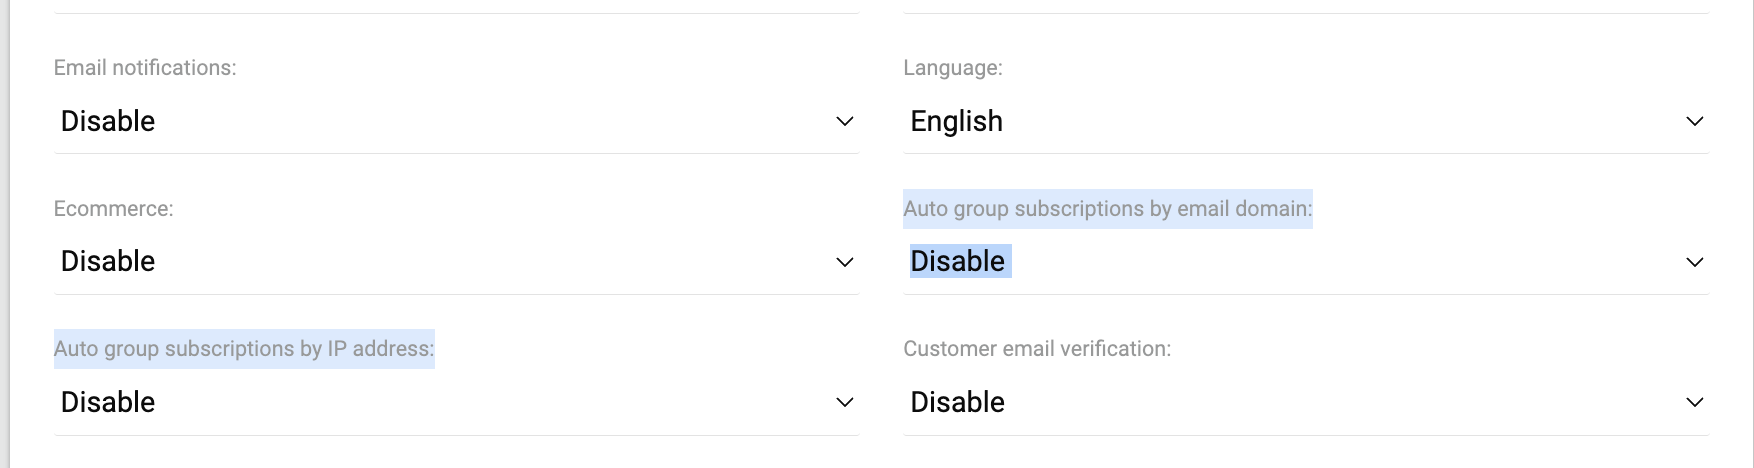
Please note that in order for the domain/IP address setting to work, make sure to enable the "Auto group subscriptions by email and IP addresses" option in the site settings (Settings -> Site Settings).
7. Fill out the payment method details
8. Click on START SUBSCRIPTION
D) Adding Members To The Membership Plan
Adding members via the platform
The membership owner can directly add members from their personal dashboard. By clicking on the 3 ellipses on the right-hand side of their membership, a menu will appear with different options. This is how a membership owner can view the subscription, update the subscription or delete the subscription.
1. From the left panel click on Customers

2. Click on customer or from the ellipses > view

2. In the subscriptions screen > click on ellipses > View members

3. Click on Add your first member
4. Type the email of the members you want to add
For each member you add you type out the email address with the domain you specified when creating the membership plan. The membership owner adds emails based on the member seats created.
5. Click on ADD MEMBER
.gif")
6. Your member is now in pending status
All members are on pending status until they log into the subscription site via the login button sent by email.
7. Once your member logs in or registers via the site they are automatically added to your membership plan
It's important to note that they have the same entitlements and access as the membership owner, and once the membership owner cancels the subscription they lose all access and entitlements. This also happens if the membership becomes inactive or expires.
8. Now your membership plan is activated and has active members

TIP: UPDATING A MEMBER'S ADDRESSYou can also update a member's address and shipping details after they have activated their membership via the platform. This is done by clicking the 3 ellipses on the left-hand side of each member's email and filling out the address information and updating it.
Adding members via the user dashboard
1. Click on My account
2. Click on My subscriptions
3. Click on manage members
4. Click on Invite members


If you are a developer please note that the membership management feature is also available to be set up via;
Restarting a Membership Subscription
Overview
This section explains how to restart an expired membership subscription in Pelcro while automatically retaining all associated members and their statuses. Restarting a subscription allows you to restore access continuity without manually re-adding or re-inviting members.
By the end of this section, you will be able to:
- Restart an expired membership subscription
- Retain active and pending members automatically
- Choose whether to reuse the same plan or select a new one
- Ensure uninterrupted member access and clean accounting
When to Use This
Use this flow when:
- A membership subscription has expired
- You want to restart it instead of creating a brand-new membership
- You want to preserve all member associations and statuses
This feature applies to membership subscriptions only.
Step 1: Locate the Expired Membership Subscription
- Navigate to Subscriptions in the Pelcro admin.
- Open the expired membership subscription you want to restart.
- Confirm the subscription status is Expired.
Step 2: Restart the Subscription
- Click Restart Subscription.
- Choose one of the following options:
- Reuse the same membership plan, or
- Select a new membership plan
Pelcro will follow the same flow as creating a new membership subscription, using the selected plan.
Step 3: Confirm Payment and Restart
- Complete the payment flow.
- Once payment succeeds:
- The subscription becomes Active
- An invoice is created on the restart date
- The membership UI reloads automatically
What Happens to Members
When the subscription is restarted:
- Active members remain active
- Pending members remain pending
- No members need to be re-added or re-invited
- Members retain access continuity without logging out or logging back in
Member associations are carried over automatically to the restarted subscription.
Accounting & Reporting Behavior
- Restarting a subscription does not affect past accounting periods
- Previously recognized revenue remains unchanged
- The new invoice is created on the restart date
Note
Subscriptions that were canceled immediately are excluded from this feature, as those subscriptions are already fully recognized for accounting purposes.
Export Members
Exporting members from a membership subscription allows you to efficiently manage and analyze your membership data. Follow the steps below to export the members.
- Navigate to the members view of your membership subscription.
- Look for the "Export" button in the interface.
FAQs
Where can I find my group members on the platform and on exports?
You can "View members" for a specific subscription when clicking on the 3 ellipses next to the membership subscription. You can export all memberships under the "Memberships" tab on the Pelcro dashboard.
What does "activating a member" mean? How do I activate one?
Once a member is invited they need to log in/register through the link sent via email. An active member is a member who went through logging in/registering on the website. A non-active member has not. The member has to activate the membership themselves via email.
What if they were automatically added to one via IP or domain?
If the member were added via IP, they would automatically be activated once they log into the website from the corresponding IP address. If they were added via domain, they would need to log into the site using their email address linked to the domain listed.
What happens to my members if I renew/cancel the group admin subscription?
If you renew your admin subscription all member subscriptions would be renewed as well and they would still have access to all entitlements. If the admin cancels the subscription, all members would lose access to all the entitlements.
Will the member.created webhook only be triggered when a user has been invited to a membership? What if they were automatically added to one via IP or domain?
The member.created webhook will be triggered when a member has been invited to a membership.
Both the 'member.created' and 'member.activated' webhooks will be triggered when a member has been automatically added via IP or domain.
Can I create Lists & Fulfillments for users that have a membership?
To learn more about how Lists & Fulfillments handle memberships, please visit this page.
Updated 5 months ago