

Plans
Now that we've covered the products side of things, we'll dive into "plans".
Plans are usually tied to a product, and as mentioned earlier, a plan allows you to set different pricing options, intervals or currencies to sell your product.
Types of Plans
There are generally two types or categories of plans which you can choose setup for your business, according to your business strategy:
- Online Plans: These are plans which are typically available and offered to your customers through your normal, publicly available channels (e.g. your website or application), which your customers can locate and subscribe to directly.
- Offline Plans: These are plans which will not be typically available to all of your customers to subscribe to directly, and usually available through a direct link that you can choose to share with your customers or a subset of your customers. Examples of offline plans can include plans which are expired, inactive, retired, or no longer available for new subscriptions.
Create a new Plan
From the toolbar, go to "Products". You'll be redirected to the main page allowing you to view all existing products. From there, you will need to select the product to which you'd like to add a plan.
Click on "View" on the line level of the product, then when redirected to the detailed view of the product, click on the "Add pricing plan" button.

Once you've clicked on the button, you'll be redirected to the Pricing Plan creation page.

To create a new plan, you'll need to enter the following information:
Required Information:
- Nickname: Name of the Plan
- Product Type: Auto-renew product VS a one time purchase
- Currency: Currency tied to your pricing plan
- Unit Price: Price per unit
- Revenue recognition type: To configure whether this plan should be recognized on a time basis or shipment basis
- Billing Interval: determines the length of your plan (monthly or yearly)
- Interval Count: determines the count of your billing interval. (i.e.; for the "Billing interval = Monthly" I'll have an "Interval Count = 1"
- Plan Availability: Determines whether the plan is available online or not
- Refund Policy: Determines whether the plan is refundable or not
- Plan Type: Determines whether the plan is a regular or a membership plan
Optional Information:
-
Internal Name: Internal reference name for the plan (not visible to public)
-
Trial Period in days: As part of this plan, you can offer your customers a number of trial days after which they will start getting billed. This provides you with the ability to fully control the grace period (ie. how long it takes before a user that has not paid loses access) - this can be configured on the plan level so that you can provide different grace periods based on the interval of the plan. For example, a yearly plan can have a grace period of 30 days, while a monthly plan can have a grace period of 7 days.)
Notes to consider:
a. Currently, there is no limitation per user to subscribe to more than one plan with trial periods.
b. There is also no limitation to the user cancelling a subscription tied to a plan with a trial period
and then subscribing to the same plan again. e.g If the plan has a 14-day trial period, as long as
the trial period of the plan hasn’t ended any new subscription will benefit from the 14-day trial
period.
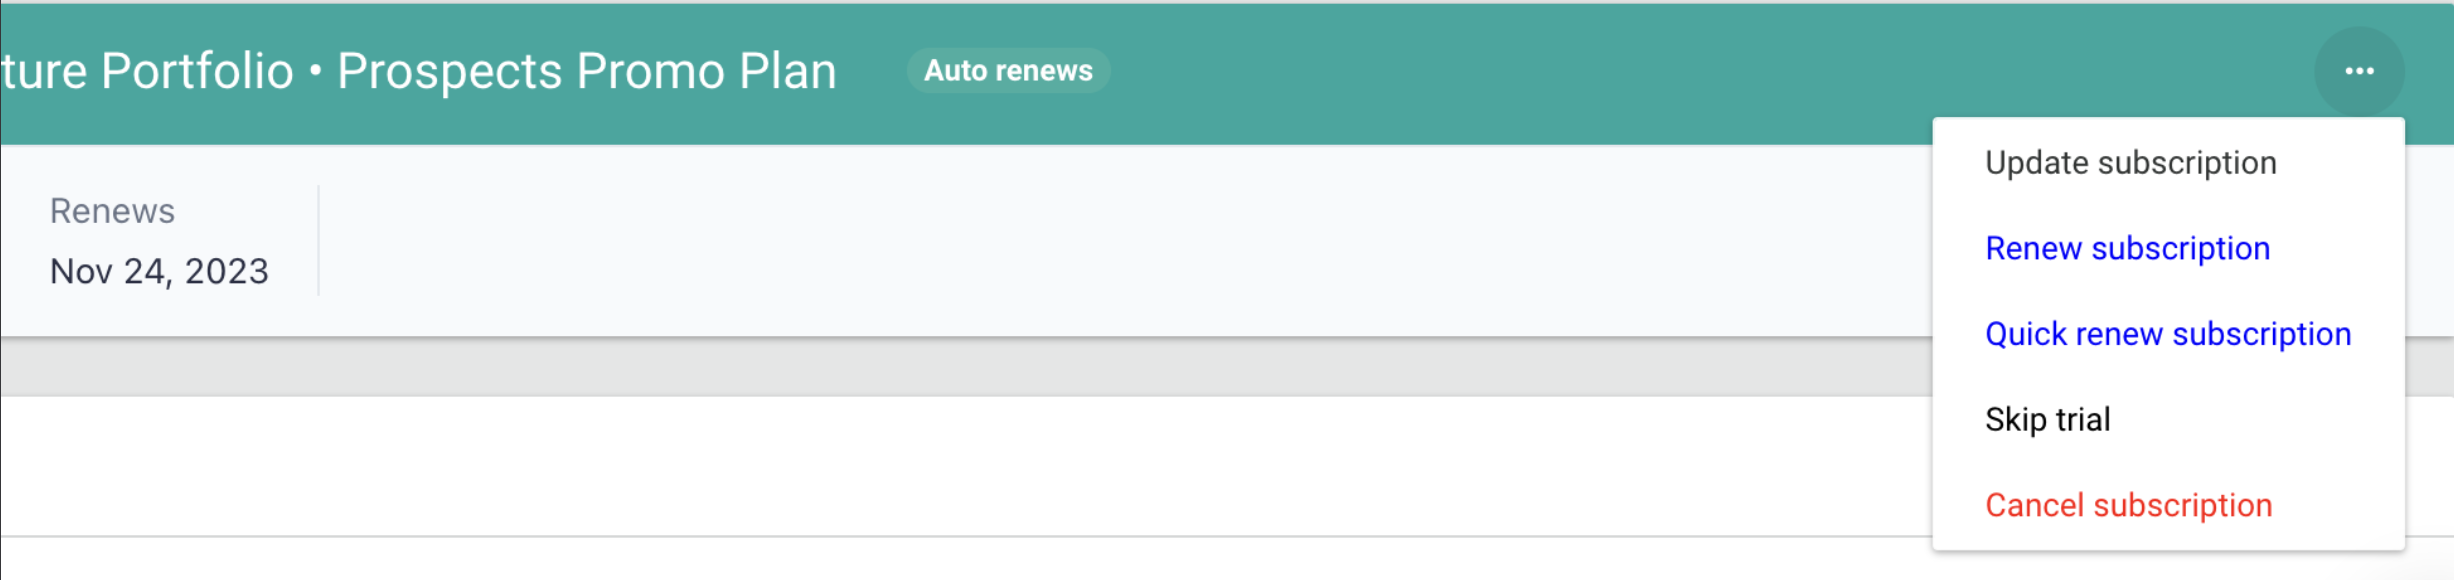
c. You will have the option to "Skip trial" on a subscription, and a payment is attempted against the subscription invoice as shown below. -
-
Shipments per interval: Based on the billing interval selected above, you will have X amount of shipments that will be shipped to your customers during that interval.
-
Description: Your pricing plan description
-
Plan available only in these countries: Limits the access to this pricing plan, only for the selected countries. The user will only see plans that are available in their country.
-
Entitlements: The entitlements that are available to the user upon subscribing to this plan. The entitlements will enable you to control the features that a user has access to.
-
Donation: To configure whether this plan is a donation or not. If it is a donation, it will not give content access to any subscriber of this plan
-
Send Invoice: To allow customers to subscribe to this plan via invoice (e.g. via check or wire payments).
-
IP Addresses: Enter IP addresses that will be used to auto-create subscriptions for customers who register with a matching IP. This is helpful for customers that need to be subscribed to a group plan when they register from an IP within the entered range. We use CIDR IP addressing scheme in order to reduce the size of the routing table required. You can convert an IP range to CIDR using a tool such as this.
-
Domains: Enter domains that will be used to auto-create subscriptions to this plan for customers who register with an email that matches one of the entered domains. This is helpful for customers that need to be subscribed to a group plan when they register using an email that matches one of the domains.
-
Auto uncollectible: The auto_uncollectible_days field on a plan sets how many days past the invoice due date must pass before the invoice is automatically marked as uncollectible. If set, it overrides the account-level default (account.settings.auto_uncollectible_after_days_past_due). A daily job checks invoices; if an invoice's due date plus the plan's auto_uncollectible_days has passed and the invoice is still open or past_due, the system marks the invoice as uncollectible and immediately cancels the associated subscription. This allows per-plan control over when unpaid invoices are written off, with values between 1-365 days (or null to use the account default).
-
Associated Segment: This refers to the segment linked to this plan. (This plan will be accessible within this segment.)

Once you've entered all of the Pricing Plan's related information, save it. You should now be able to see your pricing plan listed in the plan list, linked to that product.
Note: Free trials only work on paid plans which are on auto-renew.
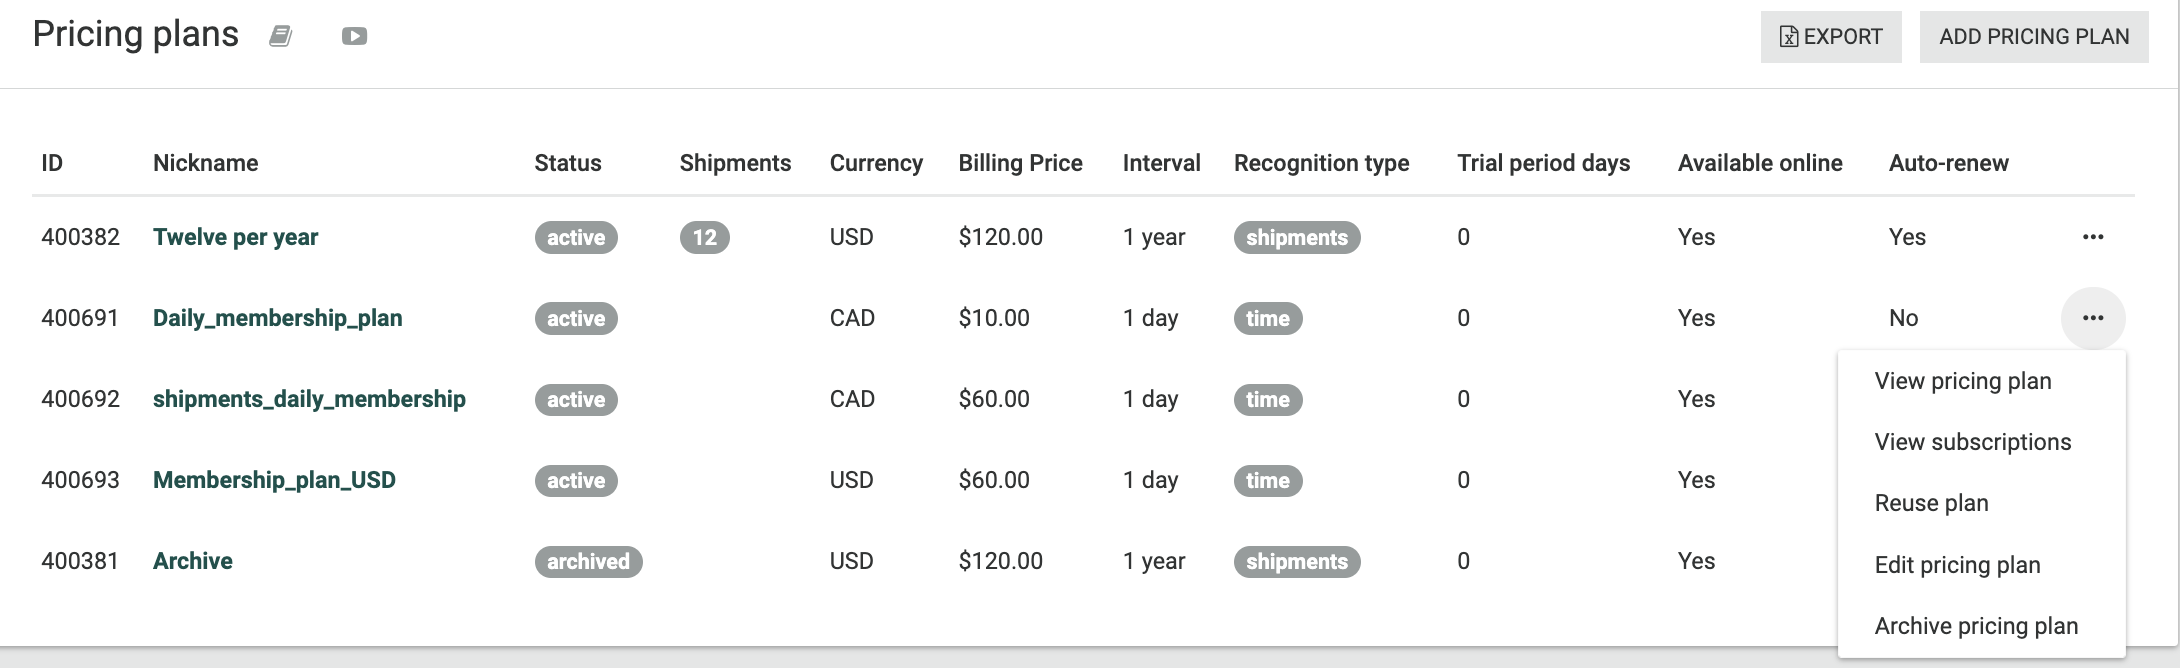
View an existing Plan
Once you've created your plan, the only way to be able to view it would by accessing the Product tied to the plan. You would be able to view the summarized view of the plan.

There is an ellipsis menu on the right where you can take quick actions from it on the plan as shown in the below screenshot:
Edit an existing Plan
In order to edit an existing Plan, go to your product, and find the plan you wish to edit from the plan list view. Click on "Edit Pricing Plan". You'll be redirected to the edit page of the pricing plan. From there, you'll be able to modify the following fields:
- Nickname
- Trial Period in days
- Shipments per interval
- Description
- Apple Product ID
- Plan available only in these countries
- Authorization
- Is the plan available online?
- Is the plan refundable?
Once you're done updating the plan, click on the "Update Pricing Plan" button, and your changes will be reflected on the pricing plan.
Delete an existing Plan
Deleting an existing pricing plan, will completely delete the plan from your Pelcro instance.
As much as we do NOT recommend the deletion of a plan, you can still perform this action as an Admin.
Archive an existing Plan
Archiving a plan, allows you to remove the plan from your list view, while still keeping it in your Pelcro database.
- Archived plans will remain visible on the platform under the plans section, but will not be available on your website (similar to offline plans).
- You will not be able to create new subscriptions on archived plans neither from the platform nor from the website.
- Current active subscriptions which are tied to archived plans, and are configured on auto-renew will continue to remain active.
- Current active subscriptions which are tied to archived plans, and are configured as one-time will continue to remain active until the last subscription phase ends, and then will no longer remain active.
Export Plans
- You can export your plans list, along with all their listed details into CSV format, by clicking on the export button to the top right-hand side of your plans list section under each product.

Updated 7 months ago