
Identity
Pelcro makes it simple to manage identity across both web and mobile platforms, allowing you to focus on your core business services.
Overview
Pelcro provides a universal authentication and authorization layer designed to secure user access and manage identities across all your digital properties.
It leverages state-of-the-art hashing algorithms and secure token management to protect user credentials and sessions.
Available Identity Features
Pelcro’s Identity Service includes everything you need to authenticate and manage your users securely:
- Password-based login and account management
- Forgot / Reset Password journeys (Platform & API)
- Authentication Management rules (unique users, session control)
- Single Sign-On (SSO) across sites or platforms
- Social Logins (Google, Facebook, Auth0)
- Passwordless Login via email magic links
These capabilities ensure a consistent, secure authentication flow whether users log in through your website, mobile app, or API integrations.
Authentication Management
Pelcro uses the customer’s email and password as the primary authentication mechanism across sites.
This ensures a secure and unified login experience while preventing duplicate user accounts.
Below are the key authentication rules provided by Pelcro to maintain security and consistency across sites.
1. Unique Customer Emails Across Accounts
Each customer email must be unique per Pelcro account.
If a user tries to register with an email already in use under the same account, the system will return an error.
How It Works
- When a new user registers, Pelcro checks for an existing record with the same email under that account.
- If found, registration fails and returns an error message.
- If your business operates multiple sites under one account, the same credentials are valid across all sites.
- Sites with the same top-level domain automatically share the
auth_token, allowing users to remain logged in as they navigate across subdomains. - For sites on different domains, you can configure cookie synchronization to provide seamless cross-domain login.
Example:
A user logged intonews.pelcro.comremains authenticated onshop.pelcro.comif both belong to the same account and domain structure.
2. Unique Collaborator Emails
Collaborator emails must also be unique across the entire Pelcro platform.
A single email address can be associated with only one Pelcro collaborator account.
How It Works
- When a new collaborator is added, Pelcro checks for an existing collaborator account with the same email.
- If a match is found, creation fails to prevent duplication and maintain secure role-based access.
- This ensures clean account ownership and reduces administrative confusion when managing multiple sites or teams.
3. Single User Authentication
Single-user authentication prevents the same user from being logged into multiple sessions simultaneously.
When enabled, Pelcro automatically invalidates previous sessions whenever a new login occurs.
How It Works
- When this feature is enabled, Pelcro invalidates existing authentication tokens issued to the same user on other browsers or devices.
- The most recent login session remains active, while older sessions become invalid.
- If a user with an invalidated token tries to perform an action, Pelcro returns an unauthenticated response, prompting them to log in again.
How to Use It:
- Log in to your Pelcro Platform account.
- Go to Settings → Site Settings.
- Toggle Enable Single User Authentication.
Single Sign-On (SSO)
Single Sign-On (SSO) allows users to access multiple services using a single set of credentials.
Depending on your setup, SSO can be implemented in two primary ways:
- Employee SSO: used internally to let company employees log in to multiple tools or services with one account. For example, Pelcro uses Google Workspace as our identity provider (IdP).
Employees can use their Gmail credentials to sign in to tools like HubSpot, Mixpanel, and other internal services — without creating separate accounts. - Customer SSO: used externally to allow your customers to sign in to multiple branded services with one unified login. For example, a company offering Service A and Service B can implement Pelcro’s identity services so users log in once and access both.
Let's focus on the second use case as this relates to our identity services. As an identity service, businesses can use our identity services to authenticate their users across multiple services. When you implement our Elements, SDKs, or public APIs to authenticate users, you are essentially connecting to our identity service in order to authenticate users.
How It Works
When a user logs in using Pelcro’s authentication, the SDK or API returns a JSON Web Token (JWT) called auth_token.
This token verifies the user’s session and allows secure, authenticated access to your other services — no repeated logins required.
| Integration Type | Behavior |
|---|---|
| APIs | You must manually include the auth_token in subsequent API calls. Session state is not automatically maintained. |
| SDKs | The SDK stores the auth_token in an obfuscated cookie, maintaining session state automatically. You can access it using window.Pelcro.user.read().auth_token. |
| Elements | Pelcro’s Elements handle authentication using the SDK internally, so session state is automatically preserved. |
Note: The
auth_tokenrepresents a user’s authenticated session. Treat it as a sensitive credential — never expose it publicly or share it via unsecured channels.
How to Use It
1. Using Pelcro APIs
Integrate directly with our Login API to authenticate users from your custom forms.
After login, store and reuse the auth_token to call any protected endpoints.
2. Using Pelcro SDKs and UI Elements
Use Pelcro’s SDK or UI Elements for seamless login handling.
The SDK automatically manages the auth_token in a secure cookie, ensuring users stay logged in without manual state management.
3. Using Integrations
Pelcro supports direct integrations with third-party platforms such as Disqus and Milibris, allowing users to log in with the same credentials across your ecosystem.
Contact [email protected] for help with these integrations.
4. Sharing the auth_token Across Services
For a unified SSO experience across multiple sites or platforms (e.g., web → mobile), you can securely pass the auth_token between services.
Once passed, use the Customer GET API to retrieve user information and validate the session.
Security Note: Only share theauth_tokenbetween trusted, secure services within your infrastructure.
Use HTTPS and short token lifetimes to prevent unauthorized use.
Example Flow
- A customer logs into Service A using Pelcro SDK.
- Pelcro issues an
auth_tokenand stores it securely in a cookie. - The user navigates to Service B, which receives and verifies the same token.
- Service B calls Pelcro’s API with the token to fetch user details — no new login required.
Identity Providers/Social Logins
Pelcro allows your users to sign in using their existing accounts from supported social identity providers such as Google, Facebook, and Auth0.
After successful authentication, the user is redirected back to your platform, and their profile information is stored in Pelcro under the customer metadata.
Below are the supported social identity providers and the steps to enable them for your site.
Google Login
Google login lets your users sign in quickly and securely using their Google accounts.
How It Works
When a user clicks Sign in with Google, Pelcro redirects the user to Google’s OAuth 2.0 server.
Once Google verifies their identity, Pelcro receives a secure token and logs the user in automatically.
How to Use It
- Create Google OAuth 2.0 credentials:
- Any application that uses OAuth 2.0 to access Google APIs must have authorization credentials that identify the application to Google's OAuth 2.0 server.
- Go to the Credentials page.
- Click Create credentials > OAuth client ID.
- Select the Web application application type.
- Name your OAuth 2.0 client and click Create.
- After configuration is complete, take note of the client ID that was created. You will need the client ID to complete the next steps. (A client secret is also created, but you need it only for server-side operations.)
- Go to the OAuth consent screen and add the following non-sensitive scopes:
.png")
- Add your Google Client ID to Pelcro:
- Go to your Pelcro Platform → Settings → Site Settings → Identity.
- Enter the Google Client ID you created in the field provided.
- Save your changes.
Note that, the Google login/register buttons will automatically appear if you are using the default Pelcro user interface. If the interface has been customized, you will either need to implement the buttons yourself or ask your account manager for assistance.
Facebook Login
Facebook Login allows your users to sign in using their Facebook account, reducing friction and improving signup conversions.
How It Works
When a user clicks “Sign in with Facebook”, Pelcro redirects them to Facebook’s OAuth authorization server.
After successful authentication, Facebook returns a secure token to Pelcro, which is then used to log the user in and pull their public profile information into your Pelcro customer directory.
How to Use It
To enable the Facebook login/register buttons, you will have to follow the steps below:
- Create a developer account on Facebook by clicking here.
- Register a Facebook application by clicking here.
- Enter your Facebook App ID in "Settings" under "Site settings". Note that your Facebook App needs to have completed the Data Use checkup on Facebook's side in order to be able to integrate with Pelcro's social login functionality. For more information please check this page
Note that, the Facebook login/register buttons will automatically appear if you are using the default Pelcro user interface. If the interface has been customized, you will either need to implement the buttons yourself or ask your account manager for assistance.

Auth0 Login
Auth0 allows you to delegate user authentication to a secure, third-party identity provider — similar to how Google or Facebook logins work.
When a user signs in with Auth0, Pelcro redirects them to Auth0’s login page. After successful authentication, Auth0 sends a secure token back to Pelcro, which is then used to log the user in and retrieve their profile data.
How It Works
- Auth0 acts as the Identity Provider (IdP), handling all authentication flows.
- Users are redirected from your site to Auth0’s hosted login page.
- Once authenticated, Auth0 sends Pelcro a verified token containing user details.
- Pelcro uses that token to create or update the user record and establish a session.
How to Use It
- Create an Auth0 account by following the sign up steps on their page
- You will need to create an Auth0 application. Pelcro IDP supports Auth0 regular web applications. When you create an application in the Auth0 Dashboard, Auth0 assigns it a client ID which is an alphanumeric string that is the unique identifier for your application. You will use this ID in your application code when you call Auth0 APIs.
- Follow the steps to create an Auth0 application. You will need to register a regular web application.
- After completing the application creation flow, you will need to navigate to the Application sections from the sidebar on your Auth0 Dashboard.

- Click on the application you created, or alternatively, click on the ellipsis menu and choose settings to go to your application settings, which will open the screen below. You will need to copy the following information: a. Client ID b. Domain

- You'll need to fill out the following fields: a. Under "Allowed Callback URLs", add your fully qualified domain name (e.g. https://yourwebsitename.com) b. Under "Allowed Web Origins", add your fully qualified domain name (e.g. https://yourwebsitename.com)

- Finally, Enter your Auth0 Client ID and Domain in the Pelcro settings page [here] (https://pelcro.com/admin/settings).
Note that, the Auth0 login/register buttons will automatically appear if you are using the default Pelcro user interface. If the interface has been customized, you will either need to implement the buttons yourself or ask your account manager for assistance.
For more information about our social login functionality, please refer to the below documentation links:
- Pelcro's JavaScript SDK
- Pelcro's SDK API
- Pelcro's Elements
Passwordless Login
Passwordless login lets your customers securely access their accounts without entering a password. They simply receive a magic link via email — once they click it, they’re logged in automatically.
In this section, you’ll learn how to enable and use Passwordless Login on your website.
Prerequisites
- The Passwordless Authentication feature enabled in your site settings.
How It Works
When a customer requests a passwordless login:
- Pelcro generates a secure token tied to the customer and your site.
- A magic link containing that token is sent to the customer’s email.
- When the link is clicked, the token is validated by Pelcro’s API, and the user is logged in automatically.
- The customer receives a valid JSON Web Token (JWT) session for authenticated access.
How to Use It
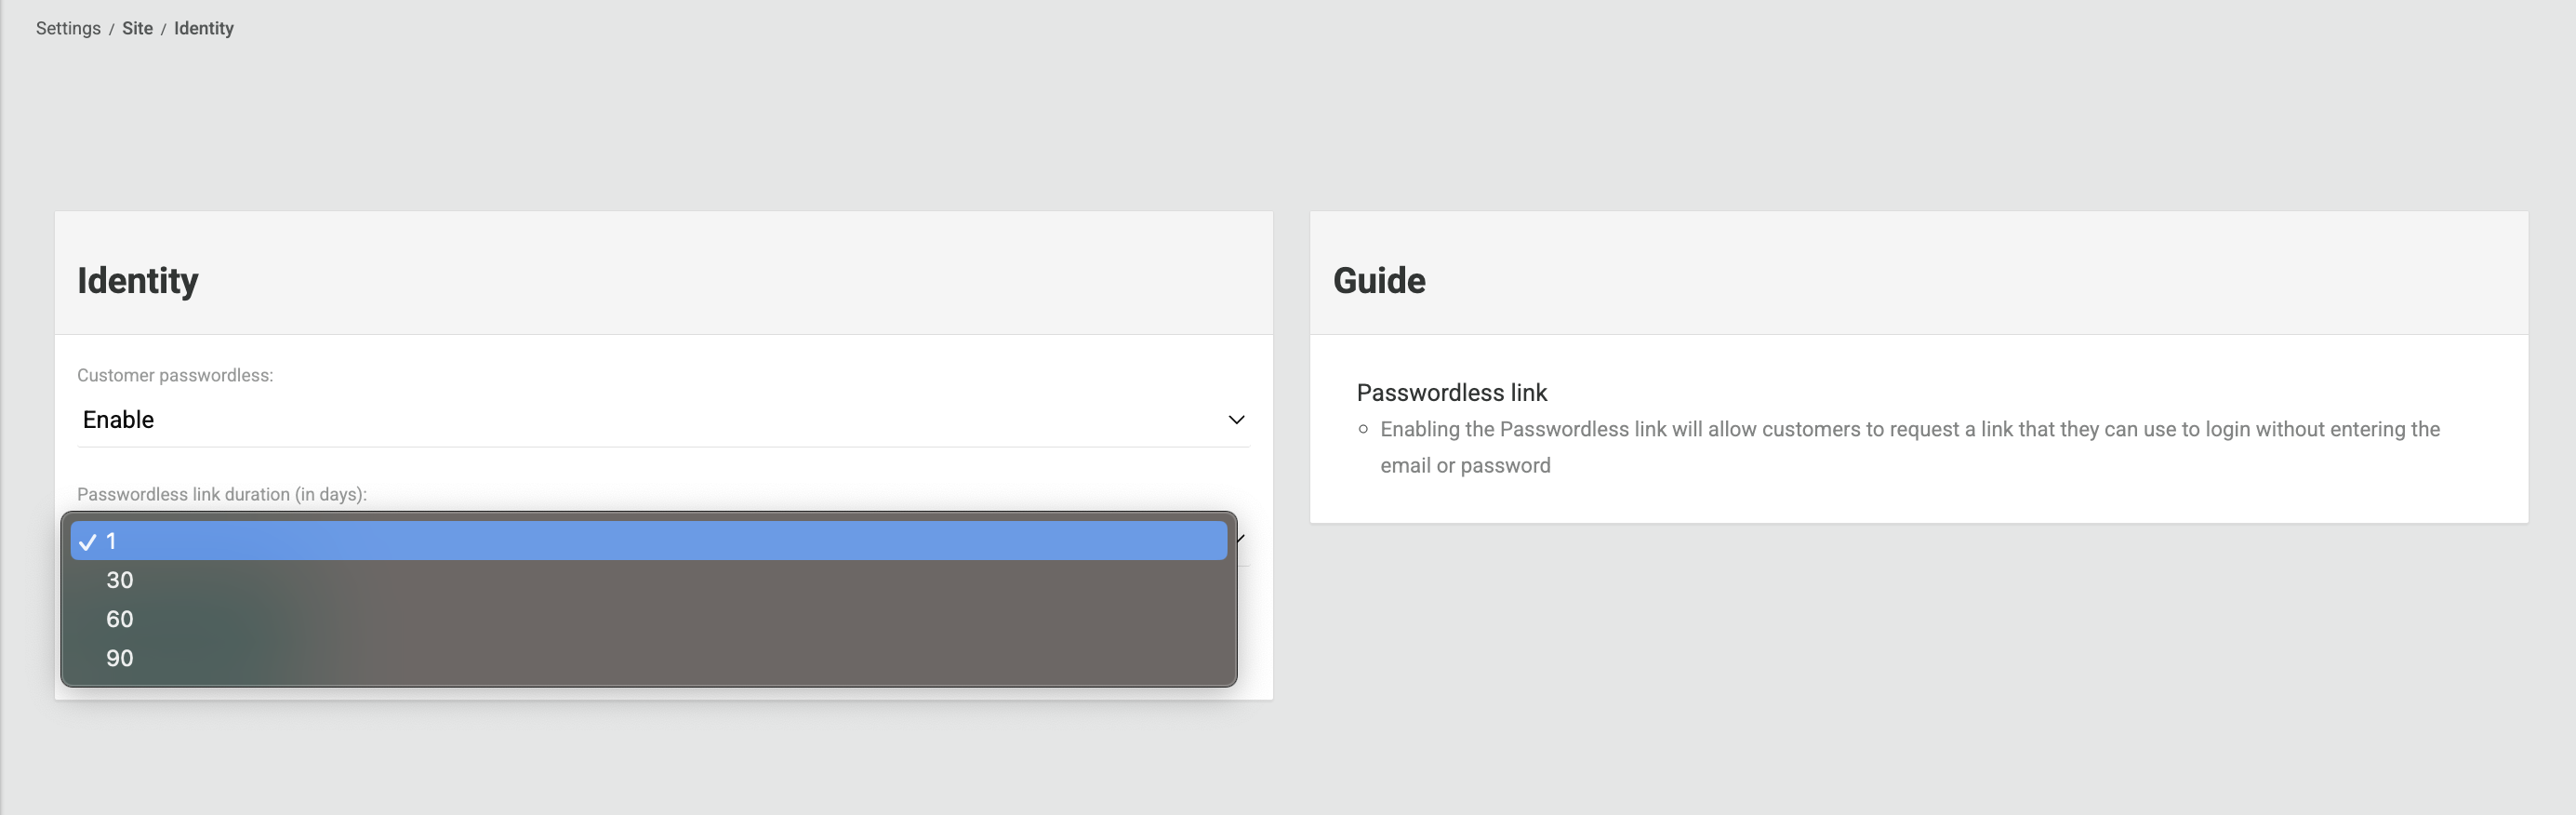
Step 1 — Enable Passwordless Login
- Log in to the Pelcro Platform.
- Go to Settings → Site Settings → Identity.
- Enable Customer Passwordless feature.
- Set your Passwordless Link Duration — choose how long the login link remains valid — 1, 30, 60, or 90 days (Default is 1 day).
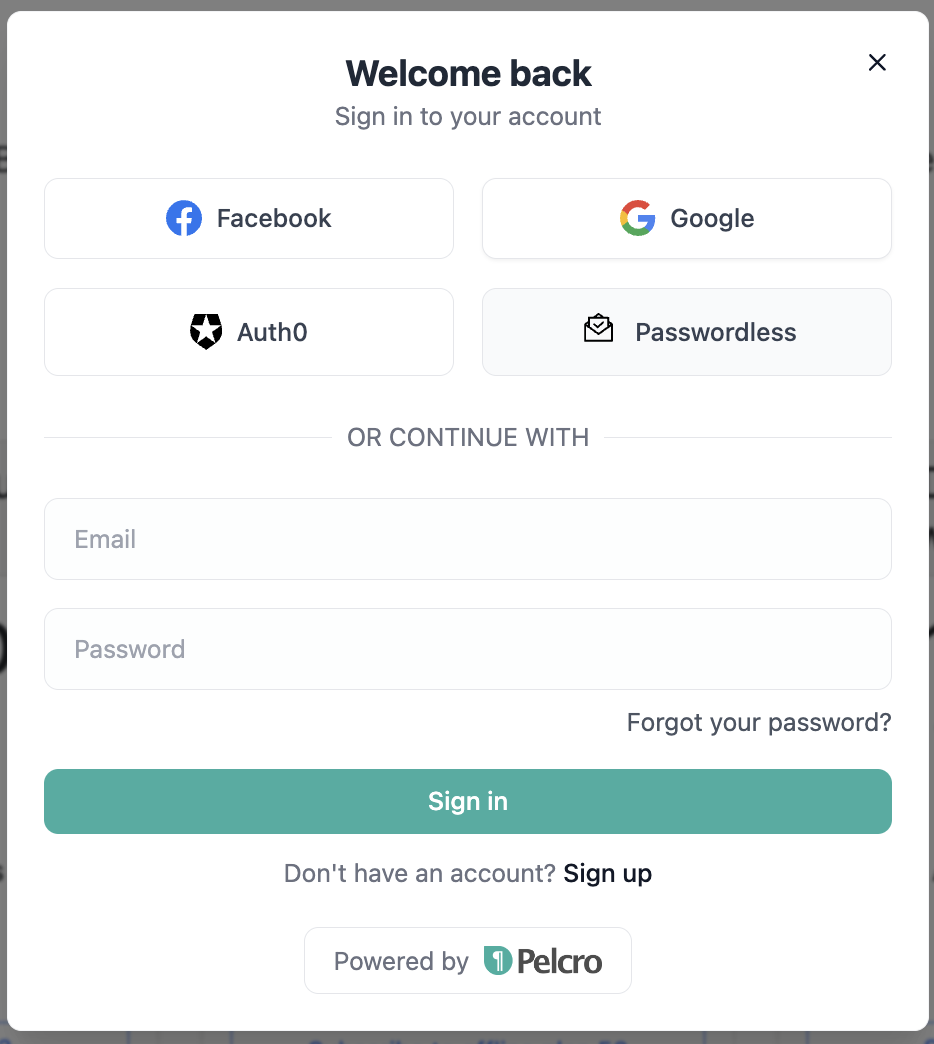
Step 2 — Customer Login Flow on Your Website
Once passwordless login is enabled, your customers will see a “Passwordless” option on your site’s login modal.
- Your customer selects “Passwordless.”
- They enter their email address.
- They receive an email with a secure magic link.
- After clicking the link, they are automatically logged in — no password required.

Step 3 — Managing the Experience
- Tokens remain valid until the configured expiration time.
- Customers can reuse the same link until it expires.
- If a token expires, the customer can simply request a new one by repeating the same steps.
Related Items
-
API Reference:
-
Webhooks:
customer.passwordless_login_requestwebhook.
Identity Recipes
Pelcro provides ready-to-use JavaScript recipes to help you quickly integrate authentication and authorization into your application using our SDK.
These examples demonstrate how to log in users, handle tokens, and manage access — so you can get started faster.
Identity Recipe
Use this recipe to learn how to authenticate users and manage identity features such as login, registration, and password flows through Pelcro’s SDK.
Authorization Recipe
Use this recipe to see how to implement authorization checks and control access to protected content or APIs..
Updated 2 months ago