
Subscriptions
A Subscription is what you would typically set up to sell and provide access for your customers to use a particular product or service. Subscriptions are an important component of Pelcro, which pieces your products, pricing plans, and customers together.
Subscriptions are typically controlled through a billing schedule ahead of time, based on the settings that you initially created as part of setting up your product & plans. Once the subscription has been created, you can start collecting recurring revenue for continuing to provide your service or product throughout the desired billing schedule.
Subscriptions can be auto-renewed on the period specified by the related pricing plan. For example, you can allow your customers to subscribe to your newsletters, blogs, press releases, etc. on a daily, weekly, monthly, or yearly basis.
The Subscription Guide will walk you through everything you'll need to know to set up and manage your subscriptions.
Subscription Lifecycle
Starting from when your subscriptions are created on Pelcro, and ending with when they get canceled, A subscription can go through a number of states, or the "Subscription Lifecycle". It’s important to understand these different states, as well as the possible transitions which one state can go from/to.

Different states of a Subscription on Pelcro
Typically, a subscription will go from one state to the other as it responds to different event triggers, such as users signing up, starting a trial period, paying a subscription, or cancellations. This will happen automatically in a normal flow. Occasionally, in order for a subscription to go from a state to another, it will require a corresponding action to be taken from either the user or the admin.
Here's a breakdown of the subscription states:
| State | Description |
|---|---|
| New | This is the starting state for any newly created subscription. A subscription would typically not remain in that state for long before transitioning into another state. |
| Trialing | The subscription is currently in a trial period. The subscription transitions automatically to active when the first payment is made. |
| Active | This is ideally the normal state for an ongoing, paid, and operative subscription. The subscription is in good standing and the most recent payment was successful. |
| Incomplete | Payment failed when the subscription was created. A successful payment needs to be made to activate the subscription. Note that a payment retrial is done within 23 hours since the subscription was created before the subscription status is changed to incomplete. |
| Scheduled | This is the state when the subscription is renewed for a future phase, but the phase has not yet started. |
| Past Due | This is the state where a subscription resides in when payment on the latest invoice either failed or wasn’t attempted. |
| Unpaid | The latest invoice hasn’t been paid but the subscription remains in place. The latest invoice remains open and invoices continue to be generated but payments aren’t attempted. |
| Cancelled | The subscription has been canceled. |
| Expired | The initial payment on the subscription failed and no successful payment was made when creating the subscription. These subscriptions do not bill customers. This status exists for tracking customers that failed to activate their subscriptions. |
So, with that in mind, let's take the following example scenarios:
-
An ideal sign up workflow would be for the subscription to transition as follows:
New -> Trialing -> ActiveThis means that the user completed the signup process, started a trial period, the provided product met their expectations, and accordingly, the user proceeded with a full signup.
-
A non-successful sign up workflow would be for the subscription to transition as follows:
New -> Trialing -> Incomplete, or New -> Incomplete
Subscription Attributes
So, let's go through all the information you'll need to have ready so that a subscription can be setup successfully:
- Customer: The person for whom the subscription will be created (i.e. the user who's signing up for the product or service). This can also be a Group subscription, but we'll get to that later.
- Product and Pricing Plan: The provided product or service which the subscription will be associated with.
- Shipping Address: Depending on the associated product/plan, some subscriptions may require a shipping address to provide the service (e.g. a subscription to a magazine which will be shipped to the customer on regular basis).
- Payment Method: This can either be set to a credit card on file, or alternatively through invoicing the customer via alternative payment methods.
- Quantity (optional): Depending on the associated product/plan, some subscriptions may require a quantity for the product/service provided (e.g. a subscription to a magazine will require the number of magazines which will be shipped to the customer).
- Gift Details (optional): In case you would like to gift the subscription to a certain user, you'll need to provide information about the recipient name, email address, and start date.
Subscription Types
- Subscriptions: This is a typical, normal subscription for a single user. This is intended for services and products which are delivered to users on an individual basis.
- Group Subscriptions: Pelcro supports "Group" subscriptions in order to make it easier for you to provide simultaneous access for larger groups of users or several customers to your product or service in the easiest way possible. For more information, please refer to the Group Subscriptions section below.
Subscription Actions
Listing Subscriptions
To view your subscriptions:
- On your Dashboard, hover over your left navigation menu. Choose "Billing" > "Subscriptions".
- You'll be redirected to the subscriptions page, where you can view and manage all your current customer subscriptions, and create new ones.
.gif")
Once you arrive at the Subscriptions page, you will see a detailed list view of all subscriptions to your products. By default, the view will list out your current (active) subscriptions.

To help navigate you through your subscriptions, you will also find the following:
- Search bar: The search bar will allow you to directly find a subscription based on a number of options. You may search subscriptions by the customer's name, email address, and address. Additionally, you can always use the subscription ID or the customer ID as well. You're able to either search all of the parameters simultaneously by leaving the search dropdown to "All", or alternatively, refine your search further by choosing the specific search parameter as shown below.

-
Search filters: Additionally, you can refine your search even further by choosing one of the available search filters to the right-side of the search bar. You can filter by one or more of the following options:
-
Subscription status
- Current: These are your currently ongoing active subscriptions.
- Past due: These are subscriptions which have an invoice that has not been paid/failed to renew by the due date.
- Unpaid: These are subscriptions which have not paid by an additional deadline, further past the original due date. This will also include ones for which all payment retry attempts are exhausted.
- Expired: These are your cancelled/expired subscriptions which are no longer active.
-
The product to which the subscription is tied to
-
The collection method of the subscription
-
Subscription creation date and expiry date
-

Your filtered criteria will be visible under the search bar. You'll be able to remove any of the selected filters by either clicking on the 'x' button next to the filter you would like to remove. Additionally, you can reset the applied filters by clicking on the filter icon to the right side of the search bar, and choosing 'Reset', or alternatively, you can clear all filters altogether.
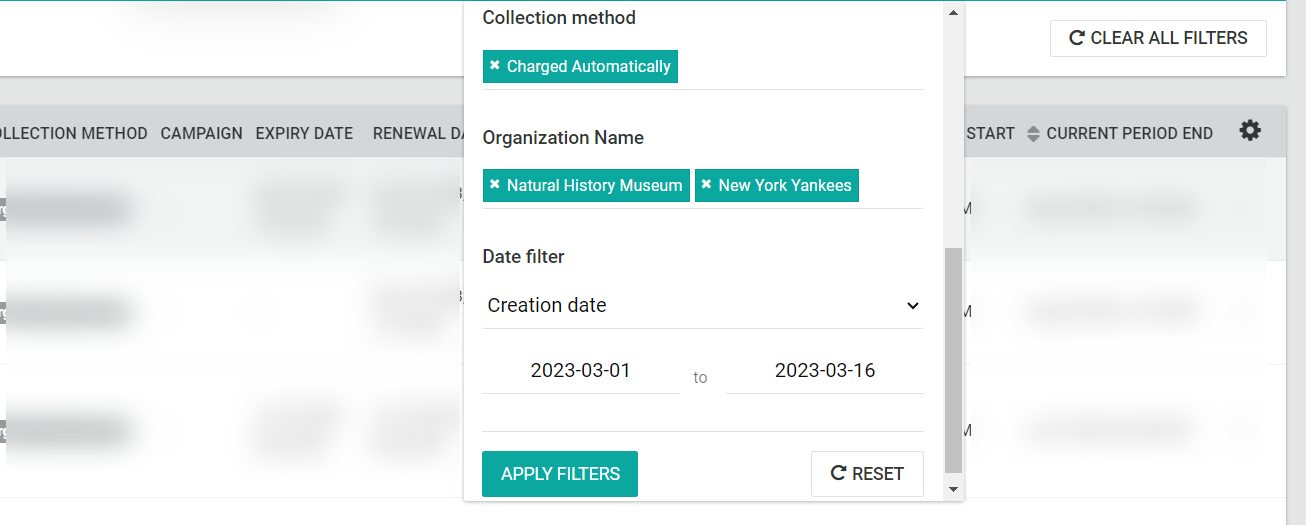
Additionally, you'll find a gear icon to the top-right corner of the table header, which you can use to show/hide specific columns on your view. This view is customizable to each collaborator independently, so the changes you make will not affect other collaborators on the same account.

Finally, you can export your subscriptions list, along with all the listed details into CSV format. The export will take all of your specified filters into account to the exported data.
You can also list subscriptions using one of the following ways:
- Pelcro's JavaScript SDK, iOS SDK , or Android SDK
- Pelcro's Core API
Viewing Subscription Details
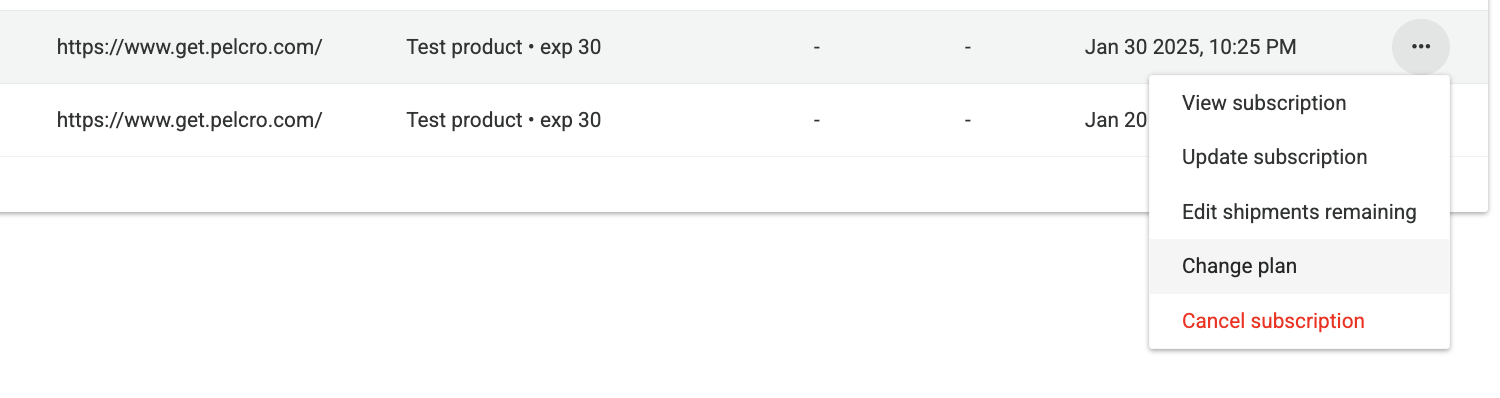
If you want to view more details of a specific subscription, click on the customer name line item, or alternatively click on the ellipsis "···" menu to the right-most column of the desired subscription, followed by "View subscription".

The subscription details page will include the following:
-
Subscription Details: This section gives you more information about the selected subscription, including:
- Subscription ID: The unique identifier for the subscription on Pelcro platform.
- Collection method: The payment collection method for this subscription. This is set to either "Auto Pay" or "Send Invoice", depending on how the subscription was set up.
- Discounts: Applicable discounts for the subscription which have been set using a coupon.
- Source: The method by which the subscription was created. This is set to Phone, Email, Website, Blow-in, Direct Mail/Post Expire, Renewal, Agency, In-Store, or Complementary.
- Days until due: Number of days until the subscription reaches it's due date.
- Date of creation: Date on which the subscription was originally created.
- Tax percentage: Applicable tax percentages in case taxes are enabled.
- Customer email address: Email address for the customer associated with the subscription
- Quantity: Amount of product/service items provided with the subscription which was created.
-
Shipment Details: This section includes customer shipping address, shipments remaining, deliverability, and suspending status. For more information, please refer to the Lists & Fulfillments documentation.
-
Pricing Details: This section provides more details on the associated product and plan, quantity, price, trial period, coupon, and taxes. For more information, please refer to the Products & Plans documentation
-
Invoices Details: This section provides details on subscription invoices, including amount, currency, status, invoice number, due date, and date of invoice creation.
-
Lists Details: This includes information about shipment lists, including list name, date of creation, when it was last updated, and corresponding approval status. For more information, please refer to the Lists & Fulfillments documentation.
-
Payment Details: This section provides information on the payment attempts for an invoice. Details include amount, currency, status, method (of payment), refunded/credited, invoice number, created (date), receipt.

You can also view subscription details using one of the following ways:
- Pelcro's JavaScript SDK, iOS SDK , or Android SDK
- Pelcro's Core API
Viewing Additional Details
You can also view more details of Pelcro components which are related to subscriptions, such as the associated Customer and Plan with the subscription. To do so, click on the three dots "···" menu to the right-most column of the desired subscription, followed by "View customer" or "View plan".

- For more information on Customer Details page, please refer to the Customer documentation.
- For more information on Plan Details page, please refer to the Products & Plans documentation.
You can also view subscription details using one of the following ways:
- Pelcro's JavaScript SDK, iOS SDK , or Android SDK
- Pelcro's Core API
Creating a Subscription
Subscriptions can be created on Pelcro when users complete their sign up process through your website, manually through the Pelcro platform, or through the Pelcro SDK/API.

To manually create a subscription through the Pelcro Platform:
- On the Subscriptions page, click on "New" on the top right-hand side of the page.
- You will then be prompted to select an existing customer in order to create a new subscription for them.
- Once a customer has been selected, you will then be required to select the existing product to which your customer will be subscribing to.
- Once you have selected the plan/product, you will see the view below.
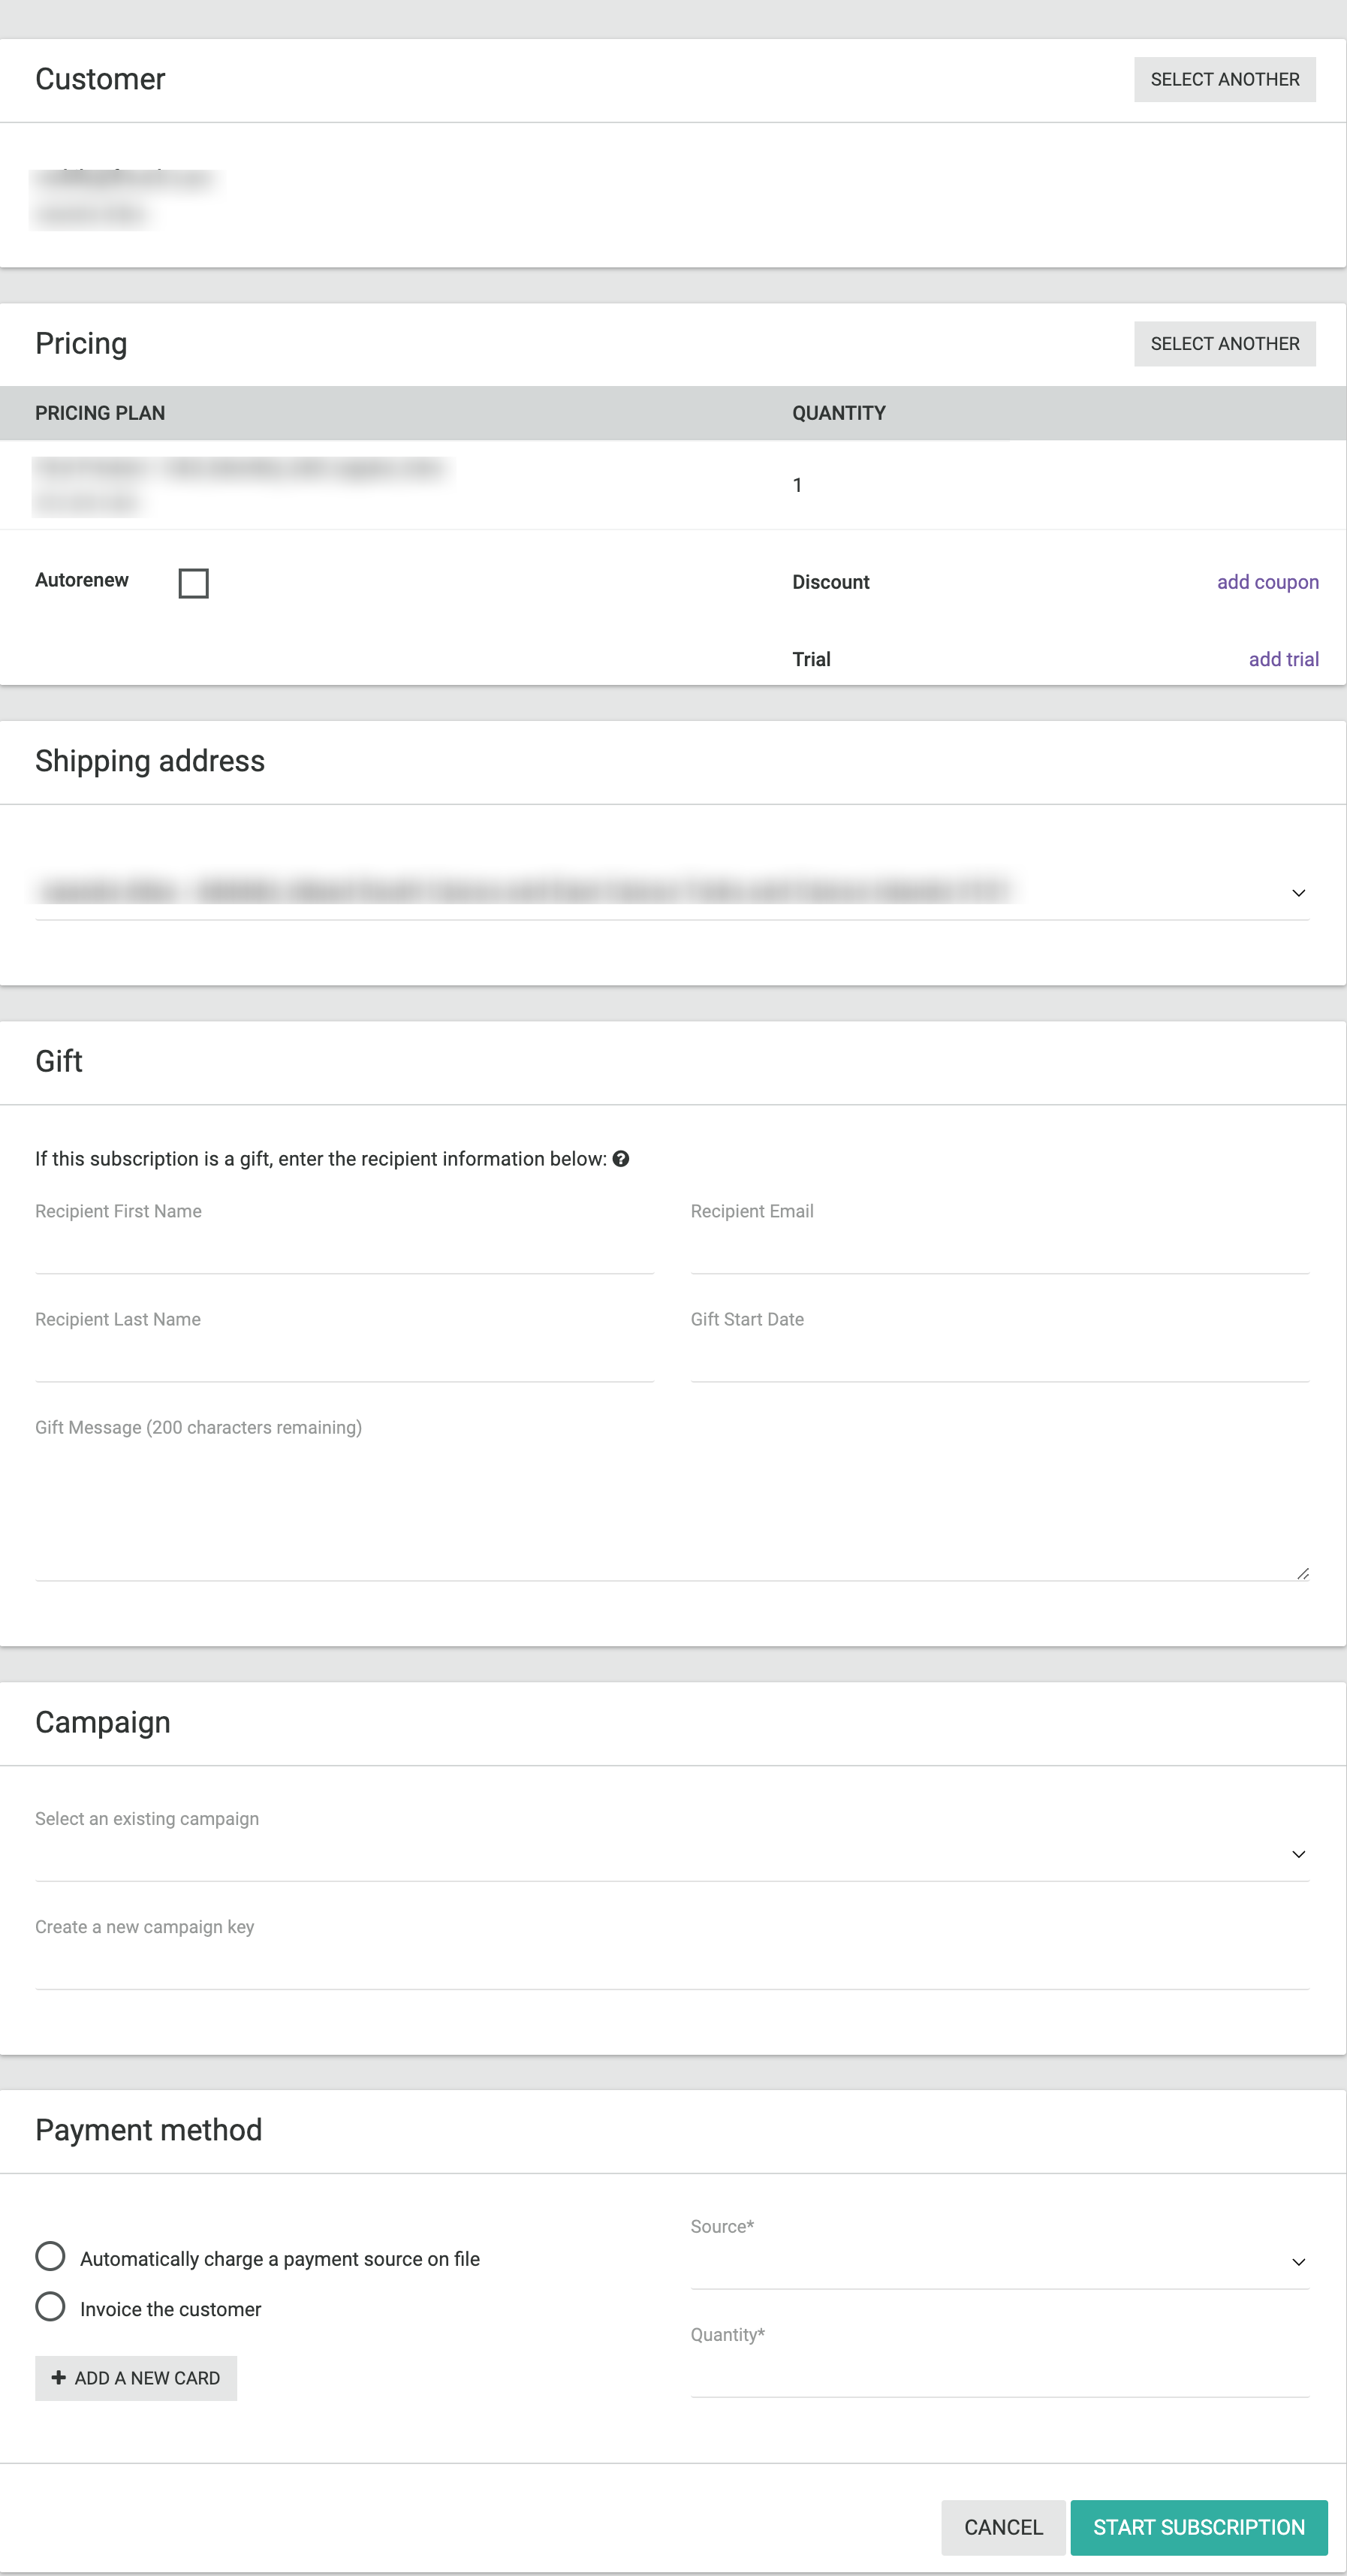
-
It's important to note that in cases when taxes are enabled for the customer account, you will have to provide the customer's address information, or alternatively, select an existing address from the saved addresses (even if the address is not required for the product of choice).
-
Next, You will then need to fill out the Payment Method. You can select different payment methods, such as Credit card payment, Offline payment, or to directly invoice the customer.
-
You can optionally:
- Set up the subscription autorenewal by checking or unchecking the Autorenew checkbox.
- Add a coupon to apply a discount.
- Edit or remove the trial period for this subscription.
- Gift a subscription to the customer, if the gift feature is supported for the customer, in which case, you will need to fill out the fields under the 'Gift' section for the recipient's name, email address, and start date.
-
Finally, click on "Start Subscription" in order to save the provided information and activate the subscription. Voila!
You can also create a subscription using one of the following ways:
- Pelcro's JavaScript SDK, iOS SDK , or Android SDK
- Pelcro's Core API or SDK API
Updating a Subscription
You can update information and details for all of your current subscriptions, given that they have not expired yet. To do so:
- Navigate to the subscriptions list page
- Click on the three dots "···" menu to the right-most column of the desired subscription, followed by "Update Subscription"

Alternatively, you can:
- Navigate to the subscription details page
- From the top right corner of the subscription details, click on the three dots "···" menu, followed by "Update Subscription"

There are a number of actions which you can do on your current subscriptions, these are listed below:
- Updating Remaining Shipments
To update the remaining shipments of a subscription:
- Click on the three dots "···" menu to the right-most column of the desired subscription, followed by "Edit shipments remaining"

- You can then proceed to update the number of shipments you want to modify, and then click "Update Subscription" button in order to save the provided information.

- Updating Shipping Address
- In case there is no current shipping address associated with the customer, you will see the following view to populate the needed fields to add a new customer shipping address to the subscription.

- In case there is a current shipping address associated with the selected subscription, you will see the following dropdown view to choose one of the available shipping addresses for the customer.

- Once you've updated the desired details, simply click "Update Subscription" button in order to save the provided information.
- Updating Subscription Source
You are able to choose one of the following options as the source for your subscription. Once you've updated the desired details, simply click "Update Subscription" button in order to save the provided information.

You can also update a subscription using one of the following ways:
- Pelcro's Core API
- Updating Subscription End Date
This feature is available only for plans with 'Renewal type' set to 'Self renew'.
- Search for the subscription
- Click on the ellipses >> update subscription
.png")
- Modify the end date. You can modify it to be before or after the current subscription end date as long as it is greater than today’s date.
- When done, click on the update button.
.png")
Notes:
- The state of the subscription during the time between the original end date and the modified end date will be 'extended'.
- If a self-renewing subscription has scheduled phases, the Change End Date option will only appear when the last scheduled phase becomes active, ensuring accurate and seamless adjustments.

Renewing a Subscription
When a subscription is created it is set to expire after a specific duration or a "phase". Depending on the associated pricing plan, the subscription can be set to automatically renew for another phase, once the current phase has expired.
In case the pricing plan is not set to auto-renew, you can manually renew a given subscription as follows:
-
Navigate to the subscriptions list page, and click on the ellipsis menu corresponding to your subscription, followed by "Renew Subscription" or alternatively, "Quick renew subscription". (When you select Quick renew, all of the required fields for renewal will be automatically populated to match the information from the current subscription, and you'll only need to confirm the payment method).
-
Alternatively, navigate to the subscription details page, and from the top right corner of the subscription details, click on the ellipsis menu, followed by "Renew Subscription" or alternatively, "Quick renew subscription".

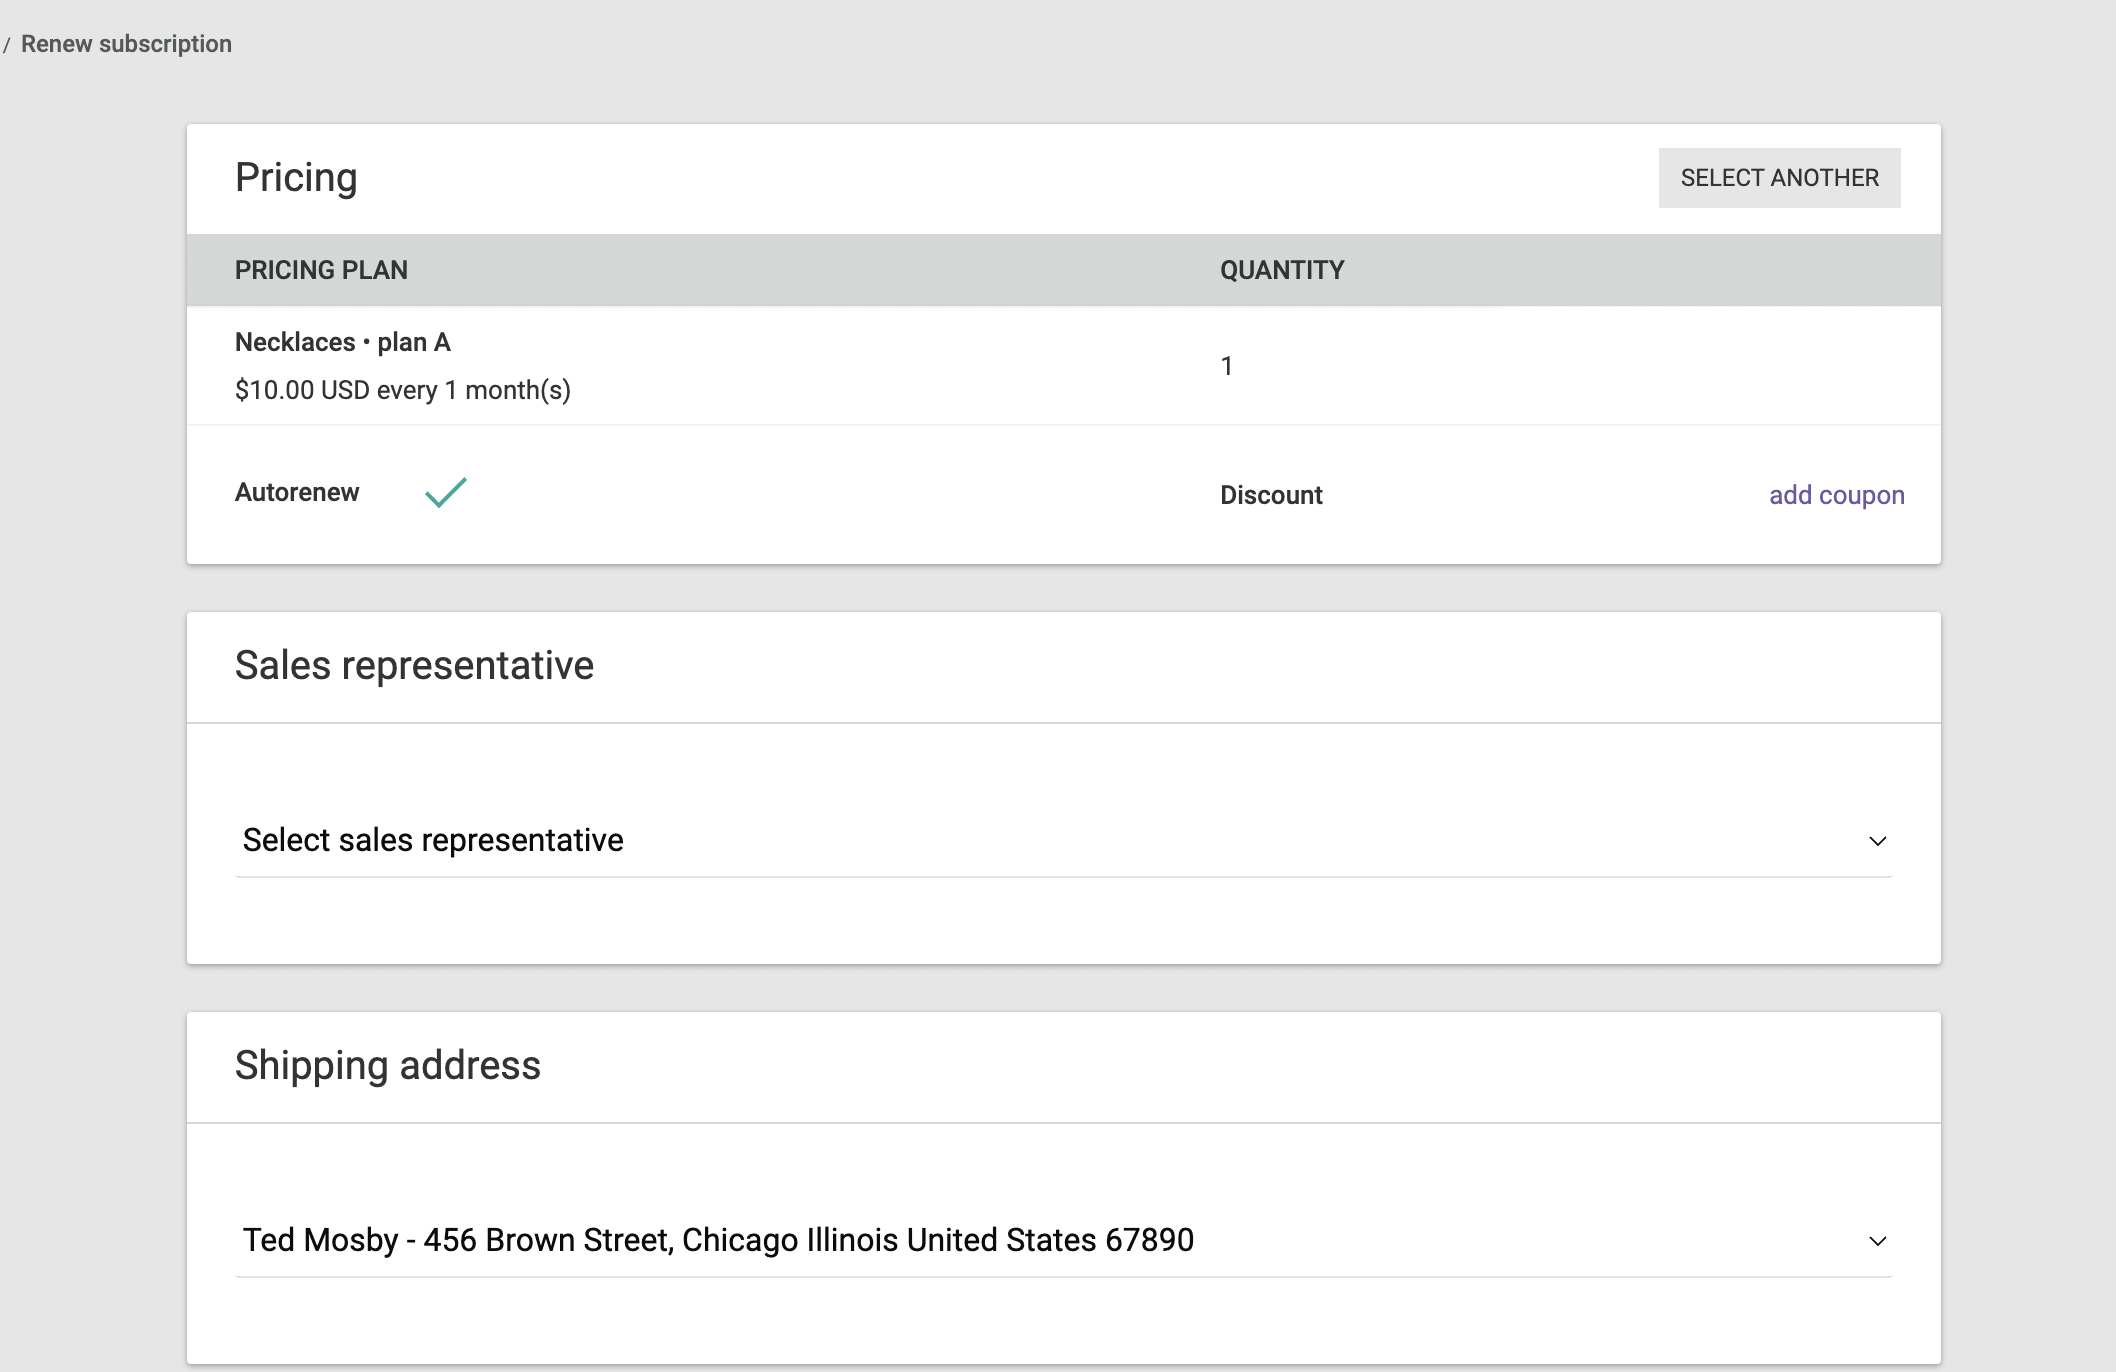
You'll then arrive at the subscription renew screen, where you'll need to fill in the information needed to renew the subscription, as follows:
- Select the product and plan for which you would like to renew the subscription to. This can either be the same product and plan for which the original subscription was associated with, or different ones.
- After the product/plan is selected, you'll need to fill in the information needed for the subscription, such as Shipping address, whether you want to set it on auto-renew or not, Source, Quantity, and Payment method.
- Finally, click on "Renew Subscription" in order to save the provided information and renew the subscription.

You can confirm that the subscription has been renewed from the subscription details page, under the pricing section; you'll be able to see a list of the future scheduled phases, along with their corresponding renewal start and end dates. Future subscriptions will have the status column set to "Scheduled".

When the subscription is renewed for a future phase, you have the option to either charge the customer for the subscription at the start date for the future phase, or immediately at the time of renewal. For more details, please refer to the Charge Upon Renewal section, under Subscription Settings.
You can also renew subscriptions using one of the following ways:
- Pelcro's SDK API
Quick Renew Subscription
You can easily renew a subscription and have the same settings by clicking on Quick Renew Subscription on the subscription actions list. This will streamline the subscription renewal process by seamlessly appending the settings applied on the current subscription plan to the renewed subscription. This includes retaining crucial details such as plan settings and customer information as shown in the screenshot.
Changing a subscription
Pelcro supports changing existing subscriptions without having to cancel and recreate them, in cases of upgrading the subscription price or switching to an equivalent price plan. This allows your customers to effortlessly change between their subscriptions directly from your site via a 1-click button when they need to access different subscriptions with higher/same price entitlements or through the platform.
The most complex aspect of changing existing subscriptions is proration, where the customer is charged a percentage of a subscription’s cost to reflect partial use. Proration ensures that customers are billed accurately, but a proration can result in different payment amounts than you expect, which may be confusing.
Important: Taxes are always excluded from the proration. For example, If the customer originally paid 100$ as taxes, the amount will be excluded while calculating the proration, and the customer will have to pay taxes again for the new plan.
We'll walk through some example scenarios which helps explain the functionality:
- Upgrade with immediate invoicing
- Billing date remains the same
- Prorations are created
- Invoice is immediately created
- Unused time on current monthly plan is credited
- Prorated time on upgraded monthly plan is charged
- Payment is attempted immediately (if applicable)
Additional Notes & Limitations:
- Please note that changing subscriptions is not supported in the following scenarios:
- Attempting to change subscription from/to plans with associated shipments
- Attempting to change subscription to archived plans
- Attempting to change an expired subscription
- Attempting to change a redeemed gift subscription
- Attempting to change a subscription which has scheduled future phases (i.e. your customer has requested to renew the subscription ahead of time before the subscription ended)
- Attempting to change subscription from/to group user plans
- Attempting to change subscriptions to from a plan that is tied to a coupon, and said coupon is invalid to use with the destination plan
- If the original subscription was paid for using a payment method that can't be charged for a second time (e.g. 3D-secure card), the subscription status will automatically transition to past_due.
- Invoices on plans which are set to charge_automatically will be charged automatically once the change request is made.
This functionality triggers the subscription.changed webhook event and is currently available with Pelcro's Javascript SDK and the platform.
Through the platform
You can easily change your subscription plan from the platform by following these steps:
- Go to Subscription Details
- Click on the three-dot menu (…) next to your subscription options.
- Select "Change Plan" from the dropdown menu.
- Choose your desired plan
- A list of available plans will be displayed.
- Select a higher-tier plan or one with the same price as your current subscription.
- Click Save to confirm your changes.
Once you save, a new invoice will be generated automatically with the calculated amount for the upgrade, your subscription will be updated instantly, and the new plan details will take effect immediately.
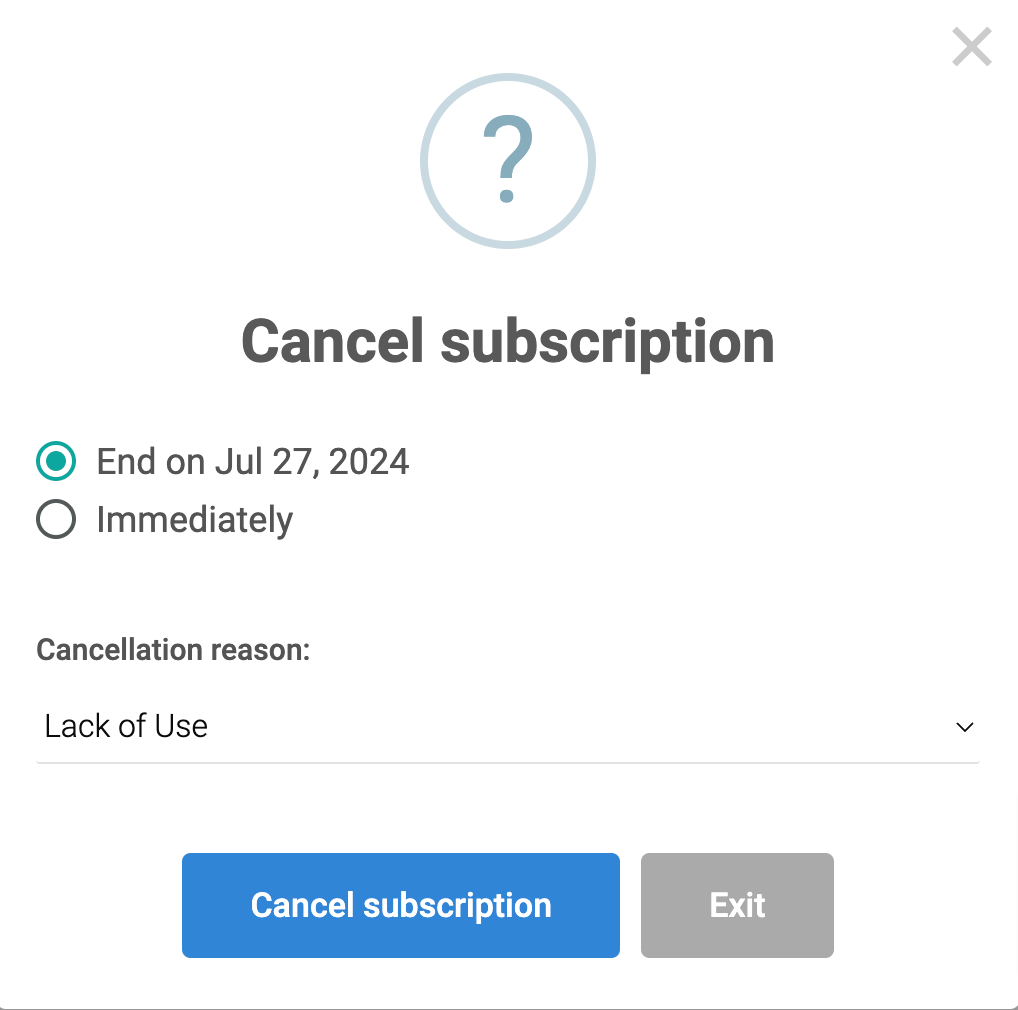
Cancelling a Subscription
In order to cancel a subscription directly from the platform, here's what you need to do:
- Either navigate to the subscriptions list page or alternatively, to the subscription details page.
- Click on the three dots "···" menu to the right-most column of the desired subscription, followed by "Cancel Subscription".
- You'll be prompted to choose between cancelling the subscription immediately, or at the end of the subscription if the subscription has no scheduled phases. Note that if you cancel a subscription immediately, and the associated plan supports refunds, your customer will be refunded the prorated amount for the period during which the subscription has not been used yet. The refund can either be processed to the source credit card or alternatively reflected on the customer's balance.
- If the subscription has future scheduled phases, you'll be prompted to choose between cancelling the subscription immediately, at the end of the subscription, or at the end of the current phase end date.
- You'll also be prompted to select the cancellation reason. The cancellation reasons that appear in the drop-down list are defined from the account settings Account settings, otherwise you can fill in the text field with the cancellation reason if no reasons are defined in the account settings.
- Choose the desired option, and click OK.

You can also cancel subscriptions using one of the following ways:
- Pelcro's JavaScript SDK, iOS SDK , or Android SDK
- Pelcro's Core API or SDK API
Cancelling all Subscriptions upon Plan Expiry
Through the platform, you will have the ability to automatically cancel all subscriptions associated to a given plan with a specific duration, once the plan expiry date is reached. This allows you to setup plans for your customers which are only available for a limited time, so your customers will not be able to subscribe/renew on an expired plan.
In order to set this up , here's what you need to do:
- Follow the steps to create a new plan, making sure that you have entered a valid future date for the "Plan Expiry Date" field.

- Once the plan is created, and subscriptions have been added for this plan, all of the associated subscriptions should automatically be cancelled when the expiry date is reached, based on Cancellation rules below:
Subscriptions which will be automatically cancelled:
- Any one-time subscription with no automatic renewals will be cancelled immediately without refund.
- Any subscription which is set to automatically renew, with all of the future renewal phases associated to the same plan will be cancelled immediately without refund.
Subscriptions which will not be automatically cancelled:
- Any subscription which is set to automatically renew, with any of the future renewal phases associated to a different plan will NOT be cancelled.
- Any subscription with a future renewal phase with the start date set to be after the plan expiry date will NOT be cancelled (whether the future phase is associated with the limited-time plan, or a different plan)
Note: Please note that the expiry_date for plans is available on our open API. You can leverage this feature to modify your UI and display the expiry dates on plans.
Subscriptions Notifications
Pelcro has a set of notifications which are associated with subscription activities and actions. The triggered notifications primarily depend on the type and set up of the corresponding subscription, and will also depend on other options associated with the subscription (whether the subscription is setup for a product with a trial period, for example). These notifications can either be received immediately or recur on regular intervals. You can also customize sending notifications based upon a specific event, action, or activity to send to your corresponding users as need be by making sure your platform is listening to the desired notification event or webhook through your email service provider.
For more information on our webhooks, please refer to our webhooks guide.
For example, subscriptions paid automatically via credit card will have completely different notifications from one paid manually by sending an invoice to the customer every billing cycle.
Below, you'll find a list of the subscription related notifications. A full list of notifications section is located under our webhooks documentation.
List of Notifications
subscription.canceled |
Occurs when a customer cancels a subscription. |
subscription.created |
Occurs when a customer subscribes to a plan. |
subscription.expired |
Occurs whenever a customer's subscription ends. |
subscription.renewed |
Occurs whenever a customer's subscription renews and a new phase is added to the subscription. |
subscription.trial_will_end |
Occurs three days before a subscription's trial period is scheduled to end, or when a trial is ended immediately |
subscription.updated |
Occurs when a subscription is updated. |
Group Subscriptions
Introduction
Before you get started with creating a group subscription, you'll need to know the following concepts:
- Group Owner: This is the primary point of contact that will be responsible for managing the group subscriptions, your group(s) of users, or customers who will be subscribed to your product or service via the group subscription. The group subscription invoice will be tied to the group owner.
- Group User: These are the customer accounts that belong to the group(s) of users or customers who will be subscribed to your product or service via the group subscription. The group users are not involved in the billing process for the group subscription. Based on the type of group user settings, group users either get a subscription via email domains or via IP Addresses.
Setting Up
Setting up your Group Owners:
First, you'll need to ensure that the group owners' plans (which will be tied to the invoice) are created separately. To do so:
- Create a product for your group owners, for example: "Group Owner Product".
- Create a pricing plan in the "Group Owner Product" with the agreed-upon billing terms. Make sure to add a descriptive name and description to the plan.
- Navigate to the Plan details view screen, and retrieve the plan id for the group owner plan which you've just created (you'll need this later on).

- Create a customer account for the group owner.
- Create a subscription under the group owner, making sure to select the pricing plan which was created for the Group owner.
Setting up your Group Users:
Next, you'll need to set up the group users, and provide them with access to the group plan and its associated benefits:
- Create a product for your group users, for example: "Group User Product".
- Create a pricing plan in the "Group User Product" with the agreed-upon billing terms. Make sure to add a descriptive name and description to the plan.
- Copy the previously set-up group owner plan ID into the group user plan field called "Group owner plan ID". This will create a parent-child relationship between the two plans, and allow you to easily navigate from the group owner to the group user plans.
- To confirm that the group user product and plan was created successfully, navigate to the plan detail view screen for the group user plan, and confirm that the "Group owner plan" was populated with the correct plan id.

While creating the group owner and group user plans, you can set up the option to have the access to the plan for specific IP addresses or email domains on the plan configuration page. Once this is configured, all users creating an account or logging in from these specific IP address(es) or email domain(s) would automatically have a free subscription created for their account with the configured plan.
Listing Group Subscriptions
It's very easy to clearly identify and segment all the different owners and users of the group subscriptions. All our reports and exports are easily segmented by-products or plans, making it easy to do any type of analysis on your group subscriptions.
To view all subscriptions associated with a group plan, go to the detailed view for the Group user plan, and then follow the below steps:
- Navigate to the product and then either click on the plan nickname line item, or alternatively, click on the ellipses of the group plan
- Click on view plan
- Click on ellipses on the top right of the plan page
- Click on view subscriptions
Subscription Settings
To access the billing settings for your site:
- On your Dashboard, hover over your left navigation menu. Click the gear icon at the very bottom of your navigation menu.
- Under "Account Settings" section, click "Billing".
- View and manage your billing settings by making sure that the checkbox for the desired option is checked/unchecked as required.
- Finally, click on "Submit" in order to save your settings.

Now, let's discuss how each of the billing settings affect your subscriptions
Charge upon Renewal
When the option for "Charge upon renewal" is enabled within Billing Settings for your site, payments will be collected when a customer decides to renew their subscription immediately once the renewal has been created on a customer record. This will reflect the amount on the customer's account balance, instead of having to wait for collecting the payment on the requested renewal start date.
Let's walk through an example scenario:
- One of your customers, Matt, has purchased a current active yearly subscription that started on July 1st, 2020 and is due to expire on July 1st, 2021. Matt has already selected the Credit Card method to pay for the subscription he had purchased.
- Before the original subscription expires (i.e. anytime between July 1st 2020 and July 1st 2021), Matt decides that he would like to renew their subscription to extend for one more year (i.e. starting July 1st 2021 to July 1st 2022). Matt contacts Customer Support to request the renewal.
- Upon receiving Matt's request, the Customer Support representative will pull up the customer record, search for the active subscription, and renew it directly from the Pelcro platform.
- When the Customer Support representative selects the Credit card as the payment method for the renewal, Matt's credit card will immediately get charged when the renewal has been submitted, and a payment record will be created on the Pelcro platform. Matt's account balance will then get credited with the amount required for the subscription renewal.
- When the requested subscription renewal becomes active on July 1st 2021, Matt's account balance will automatically be used to cover the subscription renewal charges.
Important Notes
- In order for this feature to work, the customer must have a card attached to their account.
- If your customer decides to purchase a second subscription, separate from the initially requested future renewal, the account balance will be used to pay for the newly purchased subscription.
- This feature is only accessible through the Pelcro platform only, and not through custom interfaces. If you would like to have this feature activated on your custom UI, please contact your account manager or our support team for more details.
- Please enable "Click to enable this feature for the subscriptions that are set to paying manually" if the subscriptions you have are set to manual payments and you would like to see charge upon renewal activate if a card was added for the renewal.

What happens now?
- When you're renewing a subscription for a given customer, and you're about to provide the details for the subscription after you've selected the product/plan, make sure to choose "Automatically charge a payment source on file".
- Click on "Renew Subscription" in order to save the provided information and renew the subscription.

- To confirm that the customer got charged successfully upon renewal, go to Billing > Payments. You should see a new payment for your customer with the amount for the renewed subscription. You'll also note that the customer's account balance has been credited with the same amount as well.
- Once the new phase starts, an invoice will automatically be created, and the payment for the renewed subscription will be charged directly from the customer's account balance to settle the newly-created invoice.


Automatic Uncollectible
When the option for "Automatic Uncollectible" is enabled within Billing Settings for your site, invoices which are past due by a defined amount of days will be marked as uncollectible, and the related subscription will be cancelled immediately.
Automatic Collection Method Transition
When the option for "Automatic collection method transition" is enabled within Billing Settings for your site, all subscriptions will always be updated to use the new payment method on record upon renewal.
Automatic Update of Default Payment Method
When the option for "Automatic update of default payment method" is enabled within Billing Settings for your site, once a customer's default payment method is updated, all the customer's subscriptions will be updated to use this new payment method.
Decline credit cards when CVC check is set to unavailable
When the option for "Decline credit cards when CVC check is set to unavailable" is enabled, only credit cards used for payment which have passed CVC checks would be allowed to complete a transaction.
Subscription FAQs
How can I change the associated plan with a current subscription?
You will not be able to change the associated plan to a current subscription from the platform. To do so, you will need to:
- Cancel the current subscription for the customer.
- Issue the customer a full or pro-rated refund, depending on your service policy.
- Created a new subscription with the desired new plan.
How do I manage failed payments for a subscription?
When a credit card payment associated with a subscription invoice fails, we automatically attempt to recharge the credit card based on the rules configured on Stripe. You have the flexibility to configure the following from Stripe.
- The retry payment schedule
- Email notifications
- Modifying the subscription status when all retries fail (leave subscription as is, cancel it, or mark it as unpaid)
- Modifying the invoice status (leave as is, or mark as uncollectible)
Why am I unable to update some subscriptions?
Some subscriptions are not editable through the platform, for example, subscriptions which are associated with an agency plan. Hence, you will not find the option to do so from the menu.
Additional Support
Did not find what you're looking for on this page? Need additional help?
Our support team is right there for you! Contact us now at [email protected] and we're happy to assist with any questions or concerns.
Updated 3 months ago